
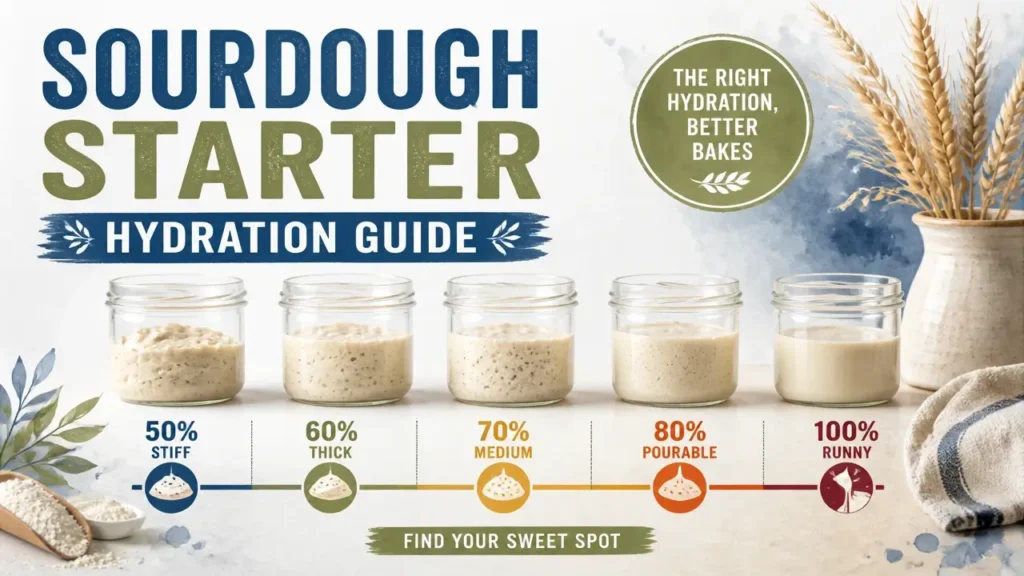
Sourdough starter hydration – the precise ratio of water weight to flour weight in your culture – controls fermentation speed, acid development, gluten behavior, and ultimately the texture of every loaf you bake. It’s not a background variable. It’s the engine.
Most guides hand you a number and call it a standard. What they skip is the mechanism: why a liquid starter peaks in four hours while a stiff one is still building at ten, why your dough feels completely different after a flour swap, and why the same percentage behaves differently in July than in January. That’s what this guide is actually about.
The Math Behind Your Jar: Hydration Defined and Calculated
Hydration percentage is the weight of water in your starter divided by the weight of flour in your starter, multiplied by 100 – nothing more, nothing less, and the whole conversation about starter behavior starts here. A 100% hydration starter contains equal weights of flour and water, which is why it looks like a thick batter rather than a dough. A 65% starter has 65 grams of water for every 100 grams of flour, which is why it feels firm enough to hold a shape.
The formula itself is short:
Hydration % = (water weight ÷ flour weight) × 100
But what that number means for your actual loaf is a bigger question – because the starter’s hydration contributes flour and water to the final dough, and if you’re not accounting for both, your total dough hydration is off before you’ve added a single gram of recipe water.
That’s what bakers call “true hydration” or overall dough hydration, and it’s the ratio that actually governs your crumb. To calculate it, you need to pull the flour and water out of your starter separately, then add them to the recipe totals:
Flour in starter = total starter weight ÷ (1 + hydration as a decimal) Water in starter = flour in starter × hydration as a decimal
So if you’re using 50g of a 100% hydration starter (hydration as a decimal = 1.0):
- Flour in starter = 50 ÷ (1 + 1.0) = 25g flour
- Water in starter = 25 × 1.0 = 25g water
Then your total dough hydration becomes:
Total Hydration % = (recipe water + starter water) ÷ (recipe flour + starter flour) × 100
These formulas work for any starter at any hydration. The only requirement is that you measure by weight, not volume. A cup of flour can vary by 20–30 grams depending on how it’s scooped; a cup of water is more consistent but still imprecise enough to throw off a careful calculation. A kitchen scale turns this from guesswork into genuine control.
Here’s a quick reference so you can run the numbers without an external tool:
| Starter Weight | Hydration % | Flour in Starter | Water in Starter |
|---|---|---|---|
| 50g | 100% | 25g | 25g |
| 50g | 80% | 27.8g | 22.2g |
| 50g | 65% | 30.3g | 19.7g |
| 100g | 100% | 50g | 50g |
| 100g | 65% | 60.6g | 39.4g |
One more variable that most guides bury in a footnote: the water you use to feed your starter matters as much as the flour you measure. According to water quality researchers at PureCityData, chloramine – a disinfectant used in many municipal water supplies – doesn’t evaporate the way free chlorine does, and it can suppress the microbial activity that makes your starter rise. If your tap water smells faintly chemical or your starter has been sluggish despite correct ratios, that’s worth investigating before you adjust your math.
The fix is straightforward: let tap water sit uncovered for 24 hours, use a filter rated for chloramine removal, or switch to bottled spring water. Hard water can actually help by buffering pH shifts in your favor; extremely soft water may not supply enough minerals for consistent yeast health. These aren’t exotic concerns – they’re the invisible variables that can make a well-calculated starter behave like it’s broken.
As Dr. Mohammed Ouhssine and research colleagues define it in their work on microbial dynamics in baking systems:
“The dough yield (DY) refers to the amount of water mixed with the flour, i.e., the ratio of flour to water when 100 g of flour are used… The dough yield index is obtained using the following expression: DY = (flour mass g + water volume mL) / (flour mass g) 100″*
Dough yield and hydration percentage are two expressions of the same underlying ratio. What matters is that you’re measuring it consistently – and that the water going into that ratio is doing its job at the microbial level, not working against you.
Liquid vs. Stiff: How Hydration Transforms Fermentation, Flavor, and Structure
A 100% hydration starter and a 65% starter are not just different textures – they’re running on different fermentation timelines, building different acid profiles, and setting up your dough for fundamentally different outcomes. Understanding why that happens makes the difference between choosing a hydration intentionally and inheriting one by default.
The liquid starter at 100% hydration behaves like a batter because it essentially is one. Water surrounds the flour particles more completely, which means the microbial population – your lactic acid bacteria and wild yeast – has more immediate access to dissolved sugars and nutrients. Fermentation moves fast. At room temperature around 21–24°C, a well-maintained 100% starter typically peaks in four to six hours. That speed produces more acetic acid early in the process, which contributes to a sharper, more pronounced tang. The dough it builds tends toward extensibility: the higher water content interferes slightly with tight gluten cross-linking, which is exactly what you want if you’re chasing an open, irregular crumb and a thin, crackling crust.
Here’s what that looks like side by side:
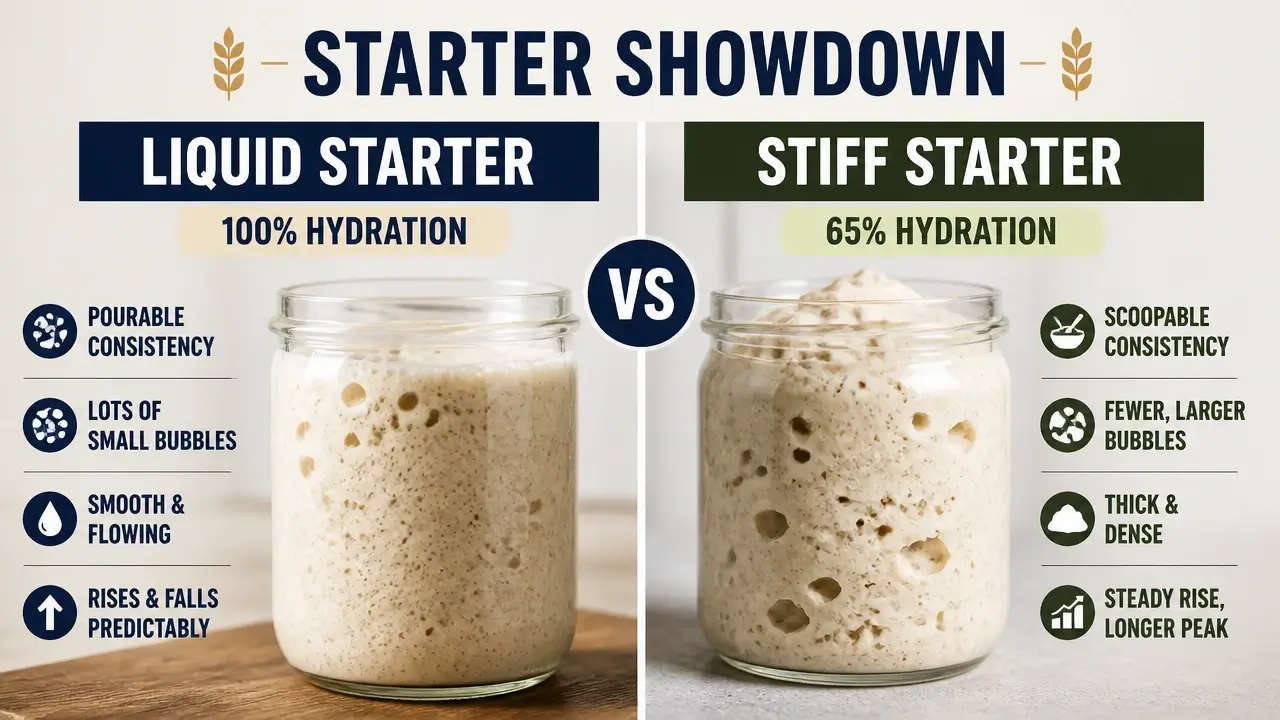
A stiff starter at 65% hydration behaves more like a firm dough – dense enough to hold its shape, slow enough to give you breathing room. With less free water available, microbial metabolism is more constrained, and fermentation can take eight to twelve hours to reach peak activity at the same temperature. That extended timeline isn’t a weakness; it’s a scheduling advantage. You have a much wider window to use the starter before it tips into over-fermentation. The acid profile it builds tends toward lactic rather than acetic dominance – rounder, more complex, less aggressively sour. Dough made with a stiff starter typically has better structure from the start, which makes it more forgiving during shaping and produces a tighter, more uniform crumb that holds together well for sandwich slices.
The flavor difference isn’t incidental. As Dr. Raffaella Di Cagno and research associates observed in their work on sourdough microbial ecosystems:
“liquid sourdoughs showed lower pH values, and higher and more stable microbial concentration than firm sourdoughs, probably due to a more homogeneous nutrient availability”
Lower pH means more acidity, faster. That’s the mechanism behind the tang difference bakers notice – it’s not a matter of one starter being “better” at flavor, but of hydration controlling the rate and type of acidification happening in the jar.
Two misconceptions are worth clearing up before moving on. The float test – dropping a spoonful of starter in water to check if it floats – is not a reliable readiness indicator for any hydration level. A liquid starter may float even when it’s past peak; a stiff starter may barely float even when it’s perfectly active. What you’re actually watching for is the rise-and-fall pattern over time, not a single snapshot. And sticky dough after mixing is not automatically a sign of too much water. Stickiness is often underdeveloped gluten, not excess hydration – a distinction that changes everything about how you respond to it.
The online consensus that 100% hydration is the “standard” starter is largely a legacy of commercial bakery documentation, not evidence that it performs better for home bakers. Many intermediate bakers report less stress, more predictable schedules, and equally satisfying bread with stiff starters at 50–65%. There is no universally optimal hydration percentage. The right one is the one that fits your flour, your timing, and your hands.
Your Decision Matrix: When to Use 100% or 65% (and the Space Between)
Baking goals, kitchen temperature, and schedule flexibility are the three variables that actually determine which starter hydration works for you – not what the recipe calls for, and not what photographs well. Once you map your situation against those three levers, the choice becomes practical rather than philosophical.
Here’s a direct framework:
| Baking Goal | Recommended Starter Hydration | Notes on Handling & Schedule |
|---|---|---|
| Open-crumb artisan loaf, same-day bake | 100% liquid | Fast peak (4–6 hrs); use at peak for maximum extensibility |
| Weekly sandwich loaf, flexible timing | 65% stiff | Slow peak (8–12 hrs); wide use window; forgiving structure |
| High whole-grain or rye loaf | 55–65% stiff | Bran particles weaken gluten; stiff starter adds structural support |
| Enriched dough (brioche, milk bread) | 65% stiff | Fats and sugars already slow fermentation; liquid starter risks over-proofing |
| Warm kitchen above 25°C | 65% or lower | Prevents runaway fermentation; stiff culture slows acid accumulation |
| Cool kitchen below 20°C | 100% liquid | Keeps microbial activity moving; liquid starter is more temperature-forgiving |
The 65–80% range is the broad middle ground where most bakers find the best balance of handling ease and crumb quality. You’re not sacrificing openness by dropping below 100% – you’re trading a small degree of extensibility for significantly more predictability.
The question of whether 65% or 75% hydration produces better bread doesn’t have a universal answer, but it does have a useful one: 75% yields an airier, more open crumb but demands more developed gluten and more confident shaping. A 65% dough is more forgiving at every stage, still produces excellent bread, and is considerably less likely to become a sticky problem on the bench. If your technique is still developing, 65–70% is not a compromise – it’s a sensible starting point that still gives you room to grow.
What this table is really saying is that hydration is a tool for your life, not a badge of ambition. The baker who consistently produces a delicious 70% loaf every week is doing more interesting work than the one who attempts 85% and ends up with a gummy mess twice a month. Choose the hydration that matches the bread you actually want to bake, in the kitchen you actually have.
Switching Sides: How to Convert Your Starter from One Hydration to Another Without Killing It
Starter hydration conversion is a math problem with a patience component – and the math is entirely manageable once you see it laid out. The culture itself is not fragile. The yeast and lactic acid bacteria that make your starter work are not going to die because you shift the water-to-flour ratio over a few feedings. What you’re changing is their environment, and they adapt quickly as long as you move in steps rather than all at once.
Converting Your Starter Hydration: The Math and Step-by-Step Process
Conversion calculations work by using the formulas from the first section to determine exactly what’s already in your starter, then adjusting the next feeding to move toward your target hydration. You don’t discard everything and start over. You take a small portion of what you have and feed it toward where you want to go.
Here’s a worked example: converting 50g of 100% hydration starter to 65% hydration over two to three feedings.
What’s in your 50g of 100% starter:
- Flour = 50 ÷ (1 + 1.0) = 25g
- Water = 25g
Target for a 65% stiff starter (using a 1:1:0.65 ratio – 1 part starter, 1 part flour, 0.65 parts water):
Feeding 1: Take 20g of your liquid starter. Add 20g flour and 13g water.
- This feeding produces a starter at approximately 74% hydration – not yet at 65%, but moving in that direction. That’s intentional. Abrupt shifts stress the culture.
Feeding 2 (12–24 hours later): Take 20g of your Feeding 1 starter. Add 20g flour and 13g water again.
- You’re now at approximately 68–70% hydration.
Feeding 3: Repeat. By the third feeding at this ratio, your starter has arrived at 65% and the culture has had time to adjust to its denser, drier environment.
The reverse conversion – stiff to liquid – follows the same logic in the opposite direction. Take a portion of your stiff starter, calculate the flour and water it contains, and feed it with proportionally more water each time until you reach 100%.
One detail almost no conversion guide mentions: if your tap water contains chloramine, the two-to-three day conversion window is exactly the wrong time to use it unfiltered. Your culture is already adapting to a new hydration environment; adding a chemical that suppresses microbial activity on top of that stress is a reliable way to produce a sluggish, confusing result. Let your water sit overnight or use filtered water specifically during the transition feedings. The math can be perfect and the conversion can still stall if the water is working against you.
For a visual walkthrough of the liquid-to-stiff conversion process, this video covers the technique in practical detail:
The scale of your feeding ratio also matters more than most guides acknowledge. As reviewed by food bio-engineers examining Tartine’s leaven preparation methods:
“Alternatively, Robertson describes a twenty-fold feeding for leaven preparation. For example, 1 g of a 50% (w/v) starter is suspended with added water to a mass of 10 g, and 10 g of dry flour mixture is mixed in. The present study, following Robertson’s feeding technique, enables a twenty-fold increase in cell densities, including an exponential growth phase, thus filling a gap in the understanding of the short-term natural history of leaven maturation”
The principle here applies directly to conversion: larger feeding ratios give the culture more room to grow into its new environment, which accelerates adaptation. A 1:2:1.3 ratio (starter : flour : water at 65%) during conversion feeds the culture more generously and tends to produce more vigorous results than a 1:1:0.65 ratio. Either works – the larger ratio just gets you there with more visible activity along the way.
Monitoring and Adjusting Your Starter During Hydration Conversion
Activity signs in a stiff starter look different from what liquid-starter bakers are used to watching for. A 65% starter won’t double in a dramatic dome the way a liquid starter does. What you’re looking for instead is a pronounced dome on the surface – the starter mounding upward – followed by a crack or network of cracks across the top as it begins to fall. That crack is the signal that the culture has reached peak activity and is starting to exhaust its food supply.
A liquid starter will still show a rise-and-fall pattern during conversion, but the timing compresses or expands depending on which direction you’re moving. If you’re converting from stiff to liquid, expect the peak to arrive earlier with each successive feeding. If you’re going the other direction, it will arrive later. Both are normal and expected.
Temperature is your most important ally during this process. Keep your converting starter at a consistent 21–24°C throughout the transition. Fluctuating temperatures make it impossible to read the culture’s behavior accurately – you can’t tell whether a slow rise is caused by the hydration shift or by a cold kitchen. Stable warmth removes that variable and lets you see the actual effect of what you’re changing.
A quick-reference formula to carry into every feeding during conversion:
New feeding = retained starter (any amount) + [flour × 1] + [water × target hydration as decimal]
So for 65% hydration: retain 20g starter + 20g flour + 13g water (20 × 0.65). For 80% hydration: retain 20g starter + 20g flour + 16g water (20 × 0.80).
Adjust the retained starter amount based on how much you need for baking, but keep the flour-to-water ratio consistent at every feeding until the culture has fully adapted – at least three feedings at the new ratio before you rely on it in a dough.
Beyond the Jar: Flour, Climate, and Other Hidden Levers of Hydration
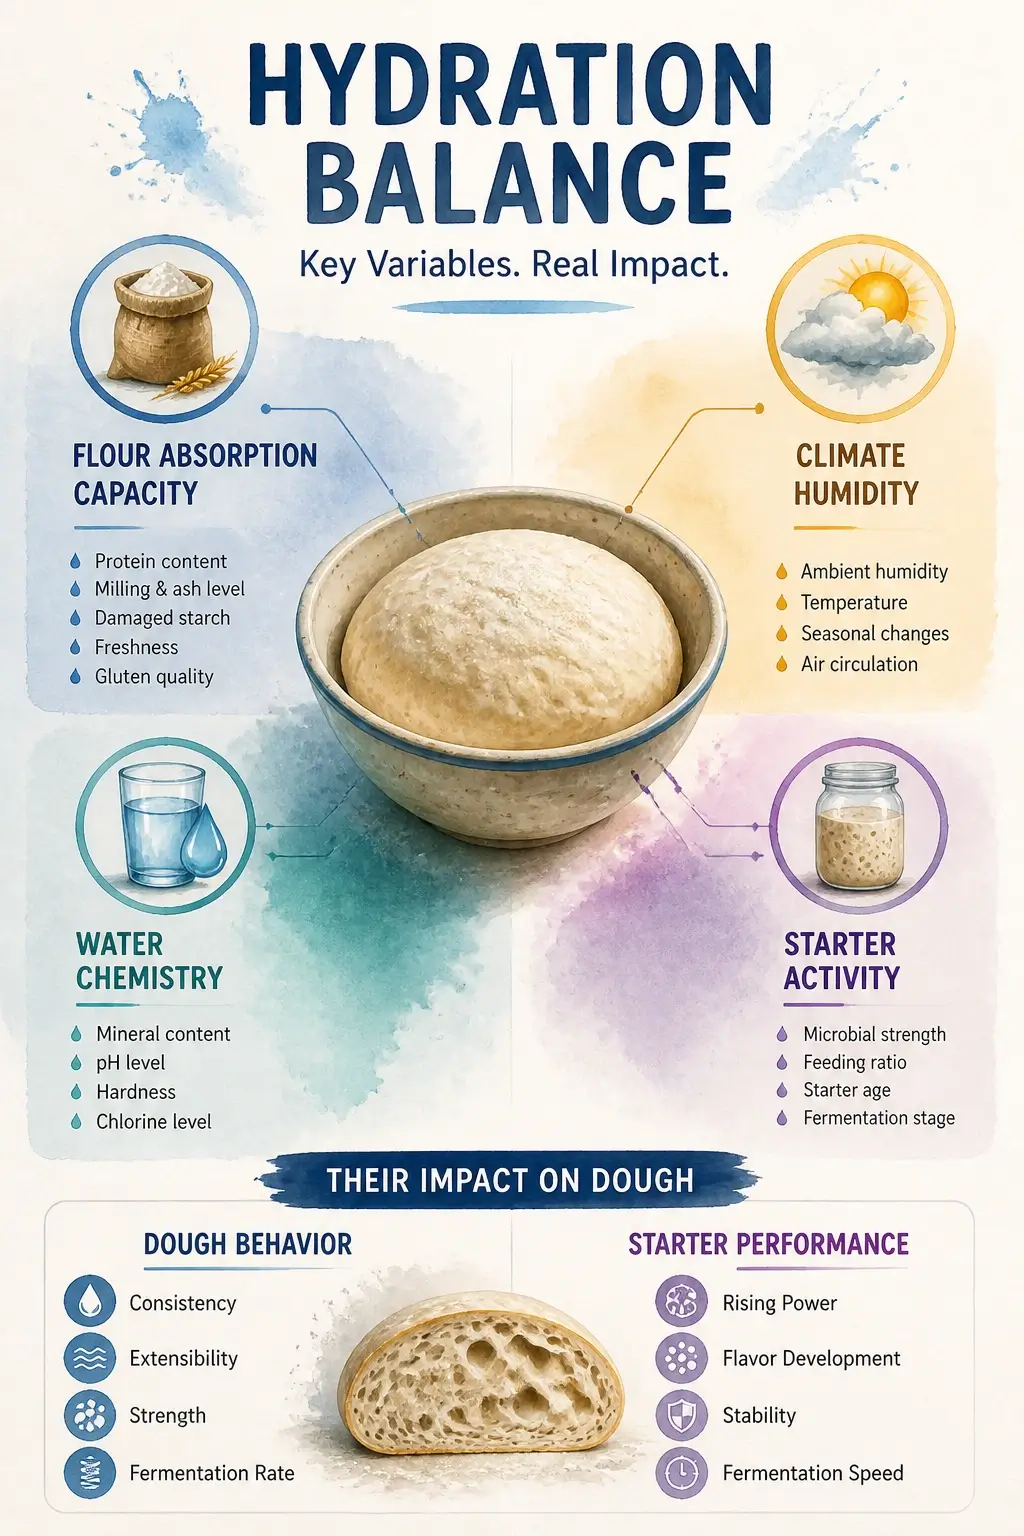
External variables – the flour on your shelf, the season outside your window, the water coming from your tap – don’t show up in the hydration formula, but they change what that formula produces in your hands. Two bakers running the same percentage with different ingredients in different kitchens can end up with doughs that feel nothing alike. That’s not a failure of the math. It’s the math operating inside a larger system.
Environmental and Flour Variables Affecting Hydration
Flour absorption capacity is the variable that surprises bakers most when they switch brands or flour types. High-protein bread flour at 12–14% protein contains more gluten-forming proteins, which are hydrophilic – they attract and hold water aggressively. A dough at 75% hydration with a 13% protein bread flour will feel noticeably stiffer than the same percentage with an 11% all-purpose flour, because the bread flour is holding more of that water inside the protein matrix rather than leaving it free in the dough. Whole-grain flours take this further: the bran particles they contain absorb significant amounts of water on their own, so a whole-wheat or whole-rye dough at 75% hydration can feel as stiff as a white-flour dough at 65%.
The practical consequence is that hydration percentages are not portable across flour types without adjustment. When you switch flours, treat the first bake as a calibration run. Mix to feel, not to number – then note what percentage that feel corresponded to, and use that as your new baseline for that flour.
Climate exerts pressure from two directions. In a dry environment, moisture evaporates from the dough surface and from the starter itself during fermentation, which effectively lowers the working hydration below what you measured when you mixed. Bakers in arid climates often need to cover their dough more tightly or increase hydration slightly to compensate. In a humid environment, the dough absorbs ambient moisture, making the same percentage feel wetter and stickier than it did in winter. This is why a recipe that worked perfectly in February can feel unmanageable in August – the hydration hasn’t changed, but the effective moisture content has.
Temperature connects to fermentation pace rather than hydration directly, but the effect on dough handling is similar enough to matter. In a hot kitchen above 25°C, fermentation accelerates and gluten begins to weaken earlier in the process. A dough that has been fermenting too fast at high hydration feels slack and sticky for reasons that have nothing to do with the water you measured – the gluten network has been compromised by over-fermentation, not by excess moisture. Recognizing that distinction changes how you respond.
For a visual summary of how these variables interact across different baking conditions:
Research examining sourdough performance across different grain types and fermentation conditions confirms the compounding effect of these variables. As the MDPI Applied Sciences Research Board found in their study on cereal grain baking parameters:
“The most productive sourdoughs were the dough with 100% Einkorn wheat flour and the dough obtained from the 1:1 combination of rye and corn flours… a cooler fermentation temperature allows the acidification activity of the microorganisms to be prolonged for a longer time”
Cooler fermentation doesn’t just slow things down – it extends the window during which the culture is building complexity rather than burning through it. That’s why refrigerator retarding works so well for flavor development, and why the same starter produces noticeably different bread in a cool winter kitchen versus a warm summer one.
Water chemistry re-enters the equation here as a reminder rather than a new concept. In high-hydration doughs, water is the largest single ingredient by weight. If your tap water carries chloramine, its suppressive effect on microbial activity is proportionally larger at 80% hydration than at 65% – there’s simply more of it in the dough. The faint swimming-pool smell that barely registered in your feeding water becomes a meaningful variable when you’re building a dough that is more water than anything else.
Troubleshooting Dough Stickiness Beyond Hydration
Underdeveloped gluten produces sticky, unmanageable dough at any hydration level – and it’s one of the most commonly misread symptoms in high-hydration baking. When a baker encounters a dough that won’t hold its shape and sticks aggressively to the bench, the instinct is to assume the hydration is too high. Sometimes that’s correct. More often, the gluten network simply hasn’t been built yet.
Gluten development takes time and mechanical work. A dough mixed and immediately shaped will be sticky at 70% hydration. The same dough after four coil folds over two hours of bulk fermentation will be smooth, elastic, and manageable – because the gluten has had the time and the physical manipulation to form the network that holds everything together.
Over-fermentation creates a similar symptom through a different mechanism. When fermentation runs too long, the organic acids produced by the bacteria begin to attack the gluten network itself, breaking down the proteins that give dough its structure. A dough that has over-fermented becomes slack, sticky, and impossible to shape regardless of its hydration percentage. The fix is not to reduce water – it’s to shorten bulk fermentation, lower the temperature, or reduce the amount of starter used.
These are not advanced-edge cases. Intermediate bakers encounter both of them regularly, especially when changing flour brands or baking through a seasonal temperature shift. The diagnosis question to ask first isn’t “is my hydration too high?” – it’s “has my gluten had enough development, and has my fermentation stayed within the right window?”
The Unspoken Truths: Common Pitfalls, Emotional Traps, and Pro-Level Fixes
Gummy crumb is one of the most common complaints in high-hydration sourdough baking, and it is almost universally misdiagnosed. Most bakers assume it means the loaf was underbaked. They put it back in the oven, add ten minutes, check the internal temperature, and still end up slicing into something that gums against the knife. The oven is not the problem. The cooling rack is.
What’s actually happening inside the loaf after it comes out of the oven is a process that continues for hours. The starch structure that was gelatinized during baking is still redistributing moisture through the crumb. Steam that was trapped inside the loaf during the bake is migrating outward. The proteins and starches are completing a transition – what food scientists call starch retrogradation – that needs time to finish before the crumb sets into a sliceable, non-gummy texture.
Research published in Cereal Chemistry examined moisture redistribution and starch phase transitions during bread staling, comparing loaves stored with and without crust at 25°C. The study found that when the crust remained intact, moisture migrated from the crumb to the crust, decreasing free water in the crumb and coinciding with increased amylopectin recrystallization – both of which contributed to firmer, better-set crumb structure. Related work published in the Journal of Agricultural and Food Chemistry used NMR analysis to show that mobile water populations in the crumb decrease as amylopectin crystals form during cooling, and that this moisture redistribution is a primary driver of crumb firming.
What this means in practical terms: for loaves above 80% hydration, the standard advice to cool for one to two hours before slicing is not enough. The physics haven’t finished. The fix – zero cost, zero equipment required – is to cool the loaf overnight, at least eight to twelve hours, before cutting into it. The loaf will stay warm for several hours after baking; that’s normal and safe. The crumb will continue setting during that time. Bakers who make this one change consistently report the gummy crumb problem disappearing without any other adjustment to their formula or process.
As Dr. Elena-Mădălina Ștefan and her research team observed in their analysis of sourdough’s effect on crumb quality:
“When high levels of SD were added to the wheat flour, it became apparent that the values for cohesiveness and resilience were significantly lower… This decrease may be due to a reduced starch staling for the samples with SD addition, which may lead to a less rigid crumb and therefore to lower firmness values”
The inverse of this finding is what matters for gummy crumb: when starch retrogradation completes properly – supported by adequate cooling time – the crumb firms up and loses that unpleasant gumminess. Cutting the loaf too early interrupts that process.
The second unspoken truth is less mechanical and more psychological, but it causes just as many failed bakes: open-crumb perfectionism. The images that dominate sourdough communities online – loaves sliced to reveal enormous, irregular holes at 80–85% hydration – represent a very specific set of conditions: high-protein flour, highly developed gluten, precise fermentation timing, and significant handling experience. Chasing that result at the wrong hydration for your flour, your kitchen, or your current skill level is a reliable path to sticky benches, collapsed loaves, and the feeling that you’re doing something fundamentally wrong.
A 70% hydration loaf, properly fermented and shaped, produces bread that the overwhelming majority of people – eating it without knowing the percentage – cannot distinguish from an 80% loaf in a blind tasting. The flavor is there. The crust is there. The crumb is open enough to be interesting and tight enough to hold a smear of butter. The difference exists, but it lives at the edge of what most people can perceive, not at the center of what makes bread worth eating.
Measure your success by flavor, texture, and the pleasure of the process. A bake that produces a delicious loaf at 68% hydration is a better bake than one that produces an anxious mess at 82%. Give yourself explicit permission to work at the hydration that fits your hands and your kitchen.
One final practical note: the “water layer” technique – placing a thin layer of water on top of a refrigerated starter to slow acetic acid development – has a sound metabolic basis, but it creates anaerobic conditions that carry real risk if not managed carefully. Standing water at room temperature can support mold and pathogen growth. If you use this method, limit it to five days maximum at room temperature, check the water surface daily for any signs of mold, and use only clean, sterile containers. A safer and equally effective alternative is simply maintaining a higher-hydration liquid starter (100% or above) and using refrigeration to moderate acid development without the added risk.
Your Hydration, Your Rules: Building a Baker’s Signature Confidence
Hydration is a tuning knob. That’s the whole principle, and everything in this guide has been working toward that single reframe. It’s not a target to hit, not a badge of difficulty, not a fixed standard handed down from commercial bakeries. It’s a variable you adjust to match your flour, your kitchen temperature, your schedule, and the bread you actually want to eat.
There is no best hydration percentage. A 65% starter maintained by a baker who understands fermentation timing and uses it consistently will produce better bread than a 100% starter managed by guesswork. A 100% starter in a cool kitchen with high-protein flour and a baker who knows how to read the dough will produce an extraordinary open crumb. The number is only meaningful in context.
As Dr. Luc De Vuyst and research colleagues put it in their work on sourdough microbial stability:
“Overall, traditional sourdoughs are characterized by relative microbial stability, provided that their propagation is carried out applying… an ideal fermentation time [which] is relative because it depends on the microbial strains and the baker’s preference”
The ideal is relative. That’s not a cop-out – it’s the most useful thing the science can tell you. Your baker’s preference is a legitimate variable in the equation.
The practical path forward is incremental. If you’re baking at 100% and want more scheduling flexibility, don’t jump to 50% – move to 80% for three bakes and observe what changes. If you’re at 65% and want a more open crumb, try 75% with the same flour before changing anything else. One variable at a time, evaluated across at least three bakes before drawing conclusions. That’s not slow progress. That’s how you build a real understanding of what’s happening rather than a collection of accidental results.
Pick one thing from this guide and implement it this week. Maybe it’s converting your starter from 100% to 80% to see how the peak timing changes. Maybe it’s letting your next high-hydration loaf cool overnight before you slice it. Maybe it’s switching to filtered water for your next three feedings and watching whether your starter’s activity shifts. Start there. The rest of the spectrum will open up from a single honest experiment.
Key Takeaways on Sourdough Starter Hydration
- Starter hydration is the weight of water divided by the weight of flour, multiplied by 100 – always measure by weight, not volume.
- A 100% hydration starter peaks faster and builds tang more quickly; a 65% starter ferments slower and gives you a wider, more forgiving use window.
- To calculate true dough hydration, extract the flour and water from your starter using the formula and add them to your recipe totals before measuring anything else.
- Converting between hydration levels takes two to three feedings and doesn’t harm your culture – move in steps and use filtered water during the transition.
- Flour type, kitchen temperature, humidity, and water chemistry all change how a given hydration percentage behaves in your hands.
- Gummy crumb in high-hydration loaves is almost always a cooling problem, not an underbaking problem – rest the loaf at least eight hours before slicing.
Frequently Asked Questions About Sourdough Starter Hydration
What’s the best hydration percentage to start with for a new or rebuilt starter?
There’s no single best percentage, but 100% hydration is the most practical starting point because it’s easy to calculate, easy to observe, and widely documented. Once your starter is established and active, experiment with 65–80% if you want more scheduling flexibility or a milder flavor profile.
What’s the biggest mistake bakers make when managing starter hydration?
The most consequential mistake is not accounting for the flour and water already inside the starter when calculating total dough hydration. If you’re adding 500g of recipe water to a dough that already contains 50g of starter water, your actual hydration is higher than your recipe suggests – and that gap compounds with every bake.
What is the 1:1:1 feeding ratio, and how does it relate to hydration?
A 1:1:1 feeding ratio means equal weights of starter, flour, and water – for example, 50g starter, 50g flour, 50g water. Because the flour and water are in equal weights, this always produces a 100% hydration starter regardless of what hydration your starter was at before feeding.
Is 65% or 75% hydration sourdough better for home bakers?
Neither is objectively better, but they’re better at different things. A 75% dough produces a more open, airier crumb but demands more developed gluten and confident shaping. A 65% dough is more forgiving at every stage, still produces excellent bread, and is considerably easier to manage if your technique is still developing.
Why does my starter seem sluggish even when my hydration math is correct?
The most likely cause is water chemistry. Chloramine in municipal tap water doesn’t evaporate like free chlorine and actively suppresses microbial activity. Try switching to filtered or bottled spring water for a few feedings and observe whether activity increases before adjusting any ratios.
Can I use the same hydration percentage year-round, or does it need to change seasonally?
You can keep the same percentage, but you’ll likely need to adjust feeding frequency and fermentation timing. In summer, a warm kitchen accelerates fermentation significantly – a 100% starter that peaks in six hours in winter may peak in three in August. Switching to a stiffer starter seasonally, or refrigerating between feedings, gives you more control without changing your core formula.
Why does my dough feel completely different after switching flour brands at the same hydration?
Different flours have different protein contents and absorption capacities. A high-protein bread flour absorbs significantly more water than all-purpose flour, so the same hydration percentage produces a noticeably stiffer dough. Treat any flour switch as a calibration bake and adjust your water by feel before committing to a new baseline.
How do I know if my sticky dough is a hydration problem or a gluten development problem?
Timing is the diagnostic. If the dough is sticky immediately after mixing, it’s almost certainly underdeveloped gluten – give it time and a few sets of coil folds before making any judgment. If the dough was manageable during bulk fermentation but became slack and sticky near the end, over-fermentation has degraded the gluten network, and reducing your fermentation time or starter percentage is the fix, not reducing water.
References
- Chloramine in Drinking Water – purecitydata.org
- Microbial Dynamics and Dough Yield in Baking Systems – sciencedirect.com
- Lactic Acid Bacteria and Sourdough Ecosystems: Liquid vs. Firm Sourdough Comparison – sciencedirect.com
- Short-Term Natural History of Leaven Maturation and Robertson’s Feeding Technique – peer-reviewed food bioengineering literature
- Sourdough Performance Across Cereal Grain Types and Fermentation Temperatures – MDPI Applied Sciences
- Moisture Redistribution and Phase Transitions During Bread Staling – onlinelibrary.wiley.com (Cereal Chemistry)
- Biopolymer Interactions, Water Dynamics and Bread Crumb Firming – lirias.kuleuven.be (Journal of Agricultural and Food Chemistry)
- Crumb Cohesiveness, Resilience, and Starch Staling in Sourdough-Enriched Wheat Flour – Dr. Elena-Mădălina Ștefan et al.
- Microbial Stability and Fermentation Time in Traditional Sourdoughs – sciencedirect.com