

A well-tended sourdough starter is one of the most forgiving things you can keep in a kitchen – once you understand what it actually is. It isn’t a recipe ingredient you measure out and move on from. It’s a small, self-sustaining fermentation culture that you build from scratch, feed on a schedule, and learn to read like a living thing.
The reason most starters fail isn’t bad technique. It’s incomplete information – guides that tell you what to do but skip the biological reason behind it. Once you know what’s happening inside the jar, the whole process starts making sense.
What a Sourdough Starter Actually Is
A sourdough starter is a fermenting mixture of flour and water that hosts wild yeasts and lactic acid bacteria – and together, those two microbial communities produce the carbon dioxide that raises bread and the organic acids that give sourdough its flavor. That’s the whole mechanism in one sentence. Everything else in this guide is just understanding how to keep those communities healthy.
It helps to contrast this with the packet of commercial yeast sitting in your pantry. Commercial yeast is a single, lab-selected strain of Saccharomyces cerevisiae, optimized for predictability and speed. A sourdough starter is the opposite: a stable ecosystem of multiple yeast species and bacteria that you cultivate from the microorganisms already living on the flour itself. No packets, no inoculation – the culture emerges from the grain.
That distinction matters because it changes how you think about the project. You’re not executing a recipe step. You’re sustaining a living thing – something closer to a pet that lives in your kitchen than an ingredient you pull off a shelf. As long as you keep feeding it, it keeps working. Neglect it long enough, and it goes dormant. But it rarely dies without warning, and that’s a reassuring fact to know before you start.
Dr. Michael Gänzle, Professor and Canada Research Chair in Food Microbiology at the University of Alberta, puts it plainly:
“Sourdough starter, the leavening agent in sourdough bread, is a natural mixture of flour and water that spontaneously ferment, predominantly by Lactic Acid Bacteria (LAB) and yeast.”
What that spontaneous fermentation looks like in practice – and why it goes through distinct, sometimes alarming phases – is what the rest of this guide walks through.
The Minimal Toolkit for Your Starter
The core tools for making a sourdough starter are deliberately unglamorous: a digital kitchen scale, a clean glass jar, the right flour, and water. Those four things are genuinely all you need. No proofing box, no special lid, no thermometer probe – not yet.
The digital kitchen scale is the one piece of equipment worth insisting on. Measuring flour and water by volume (cups and tablespoons) introduces enough variability to quietly undermine the whole process. A cup of flour can range from 120 g to 160 g depending on how it was scooped, and that swing can push your starter from a healthy 100% hydration down to a stiff 75% – a consistency that physically can’t support the right microbial balance. The false “rise” you sometimes see in a stiff starter is gas escaping through cracks, not the culture expanding. A gram-accurate scale eliminates that variable entirely.
For the jar, a quart-sized glass container with straight sides is ideal. Straight sides let you mark the level with a rubber band or tape so you can actually see whether the starter has risen – a critical readiness cue later in the process.
Flour is where a small, counterintuitive choice pays off early. For the first few days, reach for whole-grain rye or whole-wheat flour rather than all-purpose. Whole grains carry more of the natural microbes and minerals that jumpstart fermentation, because the bran and germ – where most of that microbial life lives – haven’t been milled away. Once your starter is active and showing consistent rises, you can shift to unbleached all-purpose flour for day-to-day feeding.
Water deserves more attention than most guides give it. Filtered or bottled spring water is the reliable choice. Chlorinated tap water can inhibit the culture, and most beginners know to let tap water sit uncovered for 24 hours to off-gas the chlorine. What almost no beginner guide mentions is that roughly 30% of U.S. municipal water systems use chloramine instead of chlorine as a disinfectant – and chloramine does not evaporate. Letting it sit on the counter overnight does nothing. If you live in a chloramine-treated area (your water utility’s website will tell you), the only reliable home fixes are a carbon block pitcher filter or bottled spring water. This one hidden variable can silently stall a starter no matter how perfectly you execute everything else.
Days 1–2: Your First Mix and What to Expect
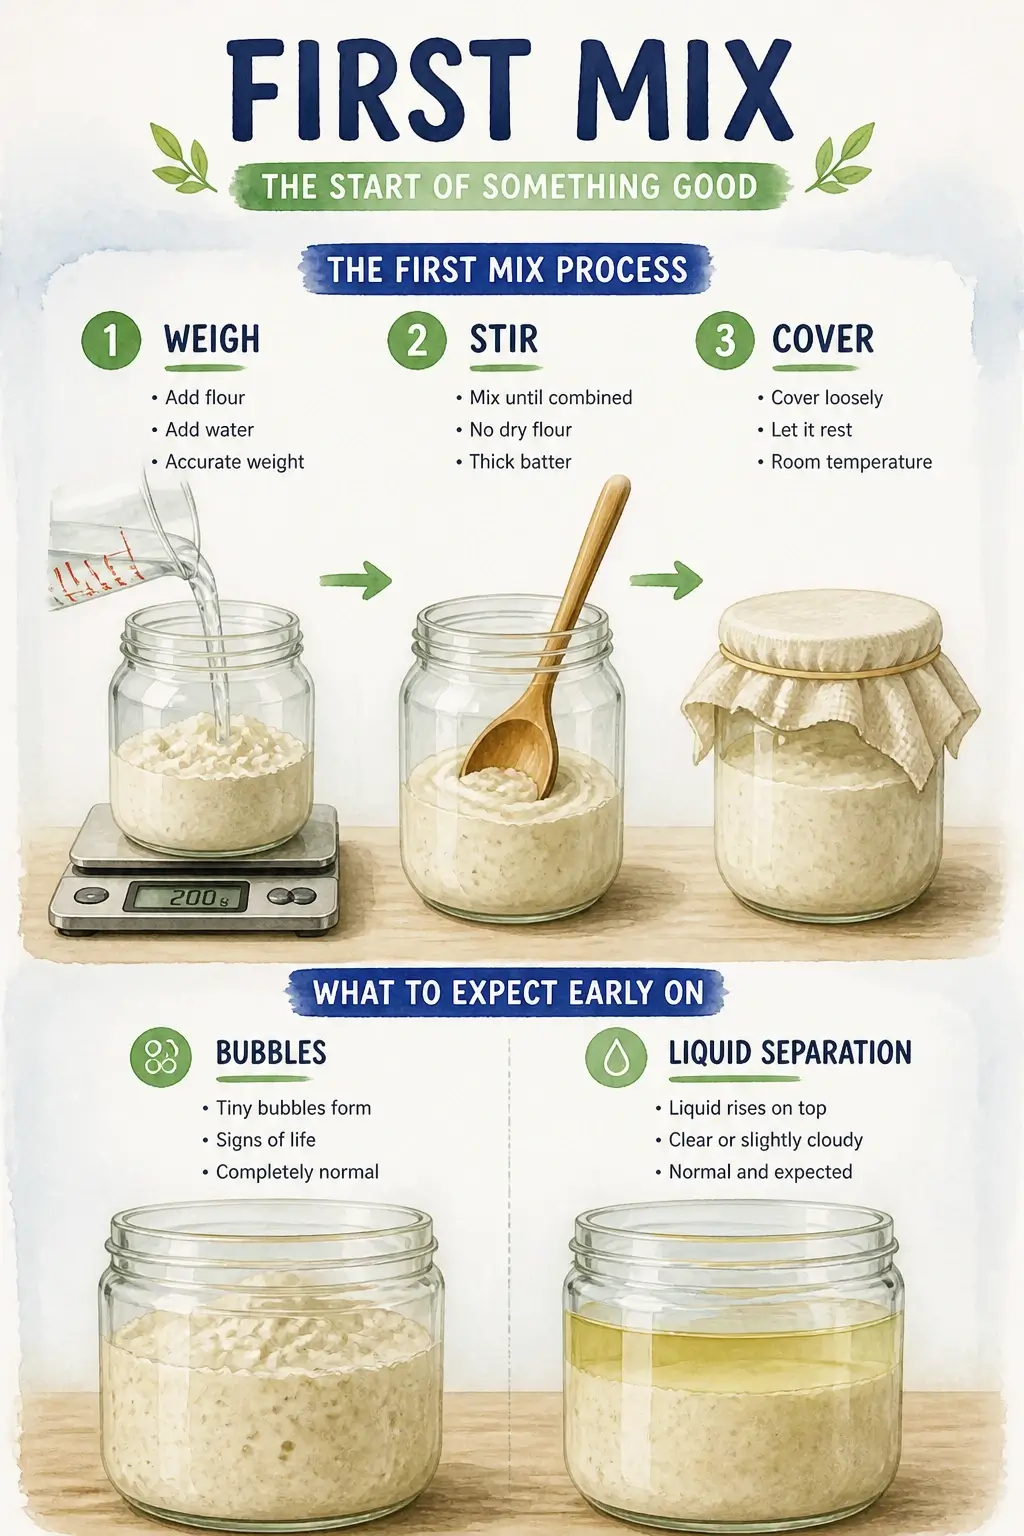
The Day 1 action is straightforward: weigh 60 g of whole-grain flour and 60 g of water into your jar, stir until no dry bits remain, scrape down the sides, cover loosely – a cloth secured with a rubber band or a lid rested on top without sealing – and leave it at room temperature. That’s it. The culture begins building itself from this moment.
By 24 to 48 hours, you’ll likely see small bubbles forming throughout the mixture, possibly some liquid separation at the surface, and a mild smell that might read as yeasty, slightly funky, or vaguely fruity. Some starters put on a dramatic early show – the mixture climbs noticeably up the jar, and you’d be forgiven for thinking you’ve already nailed it.
That early fizz is real fermentation, but it isn’t the community you’re trying to build. It’s driven by early bacterial colonists – opportunistic microbes that thrive in the initial, relatively neutral environment. They produce gas and acid, which is exciting to watch, but they’re not the stable baking culture you want. The activity will settle down, sometimes completely, over the next day or two. When it does, that’s not failure. That’s the culture transitioning, which is exactly what it’s supposed to do.
One safety note worth stating plainly: keep the jar inside, away from open windows and outdoor air. Airborne mold spores and environmental contaminants are real, and an uncovered jar left outside or near an open window invites exactly the kind of contamination that’s impossible to fix later. A kitchen counter, away from direct sunlight and drafts, is the right environment.
Dr. Maria-Ioana Socaciu, a researcher in Food Science and Technology at the University of Agricultural Sciences and Veterinary Medicine of Cluj-Napoca, found something useful about timing here:
“The acidification rate of the dough was faster at 35 °C than at 25 °C. This fact became evident via the pH values obtained in the first 24 h. However, from this point, the pH values were lower in the samples kept at 25 °C… Optimal pH values for the samples determined that the optimal fermentation period was 48 h.”
In plain terms: a warmer environment speeds up the initial acidification, but a moderate, steady temperature – around 25°C (77°F) – produces the more favorable acid profile over the first 48 hours. The environment you choose from Day 1 shapes the culture’s trajectory.
Here’s a visual overview of what to expect across the first two days:
Temperature Management: Warmth Without a Fancy Box
Temperature is the single most controllable variable in your kitchen, and it has an outsized effect on how quickly your starter matures. The optimal fermentation range is 75–85°F (24–29°C). Below 70°F, microbial activity slows significantly – the culture is still alive, just working in slow motion. Above 90°F, you risk pushing past the thermal tolerance of the yeast and beneficial bacteria, which can shift the culture’s balance in the wrong direction.
You don’t need a thermometer probe to work with this. A simple ambient temperature reading of the spot where you’ll place the jar is enough – most kitchen thermometers or even a cheap infrared thermometer will do. What you’re looking for is a consistently warm location, not a precisely calibrated one.
Some reliable warm spots that most kitchens already have: the top of the refrigerator (the compressor generates steady heat), near a wireless router, or inside a turned-off microwave with the door left slightly ajar. Each of these can hold a reasonably stable warmth without any intervention.
The oven-light method is the trick that experienced bakers quietly rely on, and it costs nothing more than the electricity for a standard appliance bulb. Place the jar on the middle rack, turn on the oven light only – not the oven itself – and close the door. The bulb alone maintains a steady 75–82°F, which sits squarely in the ideal range. The reason this matters more than it might seem: every 10°F drop below 80°F can roughly double the time it takes for your starter to mature. Consistent warmth doesn’t just speed things up – it reduces the number of variables that can send the process sideways.
One important caution: if you use the oven-light method, place a sticky note over the oven controls before you walk away. A preheated oven will kill the starter in minutes, and it’s an easy mistake to make when someone else is in the kitchen.
Professor Mohammed Ouhssine from the Faculty of Sciences in Kenitra, Morocco, whose research used real-time fermentation tracking to monitor temperature’s effect on dough development, confirmed what bakers have observed by instinct:
“Real-time tracking of multiple parameters (pH, dough rising, ethanol release, and total titratable acidity) was monitored by a smart fermentation oven… The acidification rate of the dough was faster at 35 °C than at 25 °C.”
The practical takeaway: a stable warm environment doesn’t just make things faster – it makes the acidification pattern more predictable, which means fewer surprises between Day 3 and Day 7.
Days 3–5: The Feeding Schedule and the Quiet Phase
This is the section of the process where most beginners give up. The starter was active, then it went completely still, and now it looks like nothing is happening. No rise. Maybe a faint smell. The instinct is to assume something went wrong and start over. That instinct is almost always incorrect.
The sudden silence isn’t a failure – it’s a biological changing of the guard happening inside the jar. Understanding why it happens is the thing that keeps you feeding through it.
The Daily Discard-and-Feed Routine
The daily ritual from Day 2 onward is the same each time: remove roughly half of the mixture – about 60 g – and discard it (or save it for discard recipes once you’re further along). Then add 60 g of fresh flour and 60 g of water, stir thoroughly, and cover loosely again.
The discard step is the one that trips up beginners most often, because it feels wasteful and counterintuitive. Why throw away the culture you’re trying to build? The answer is that the microbes inside the jar consume the available food – the starches and sugars in the flour – faster than a single feeding can replenish it. If you don’t remove a portion, the microbes exhaust their food source, the acid level spikes, and the culture stalls or shifts in an unfavorable direction. You must remove at least half each time.
The second common error runs the other direction: feeding more than once a day during Days 2–4. Until the culture has stabilized – which typically happens around Day 4 or 5 – a single daily feed is the right cadence. Feeding more frequently dilutes the microbial population before it can reach the density it needs. One feed per day, same time each day if possible, and let the culture do its work in between.
Here’s a step-by-step walkthrough of the process if you’d like to watch it in action before your first feed:
Why the Starter Goes Quiet on Days 3–5
The early bloom of activity you saw in Days 1–2 was driven by bacteria like Leuconostoc and Enterococcus – pioneer species that colonize the fresh flour-water mixture quickly and produce acid as a byproduct. That acid production is the mechanism that makes them self-limiting: as the environment acidifies, it suppresses the very bacteria that created it. Their numbers drop, and the jar goes quiet.
This is ecological succession – the same process that happens in any new microbial environment. The pioneer community clears the way for the stable community by making the environment hostile to everything except acid-tolerant organisms. What comes next are Lactobacillus bacteria and wild yeasts, which thrive in the acidic conditions the pioneers created. These are the organisms you actually want – the ones that will raise your bread and give sourdough its flavor.
The starter isn’t dead during this quiet phase. Look closely and you’ll likely see tiny surface bubbles and catch a developing tangy scent. That’s the new community establishing itself. But the visible activity is minimal, and it can stay that way for 24 to 48 hours before things pick back up.
Dr. Paul J. Sadowski from the Department of Biochemistry and Biomedical Sciences at McMaster University observed this transition directly in his research:
“The cultures were fed with a frequency based on the rise observed, and by the fourth day, a regular daily rise was observed… The mature leaven microbiome replaces the microbiome endogenous to flour in every growth cycle.”
That phrase – “replaces the microbiome endogenous to flour” – is the key insight. Each feeding cycle, the stable community you’re cultivating gradually displaces the flour’s native microbial population and makes the starter its own. The quiet phase on Days 3–5 is that displacement happening. Keep feeding through it.
How to Tell When Your Starter Is Ready
Readiness isn’t a fixed date on the calendar – it’s a set of observable behaviors the starter consistently demonstrates. A starter that performs these reliably is ready to raise bread. One that performs them only occasionally needs more time.
The primary indicator is volume doubling. Within 4 to 6 hours after a feeding (up to 8 hours in a cooler kitchen), the starter should at least double in volume, with a domed, bubbly surface at its peak. The rubber band or tape mark on your jar makes this easy to track – you’re watching for the level to reach at least twice the marked starting point.
The float test is the secondary check most guides lead with, but it’s worth understanding its limitations. Drop a small spoonful of fed starter into a glass of room-temperature water: if it floats, the gas content is high enough to suggest leavening potential. The catch is that a starter can trap enough gas to float briefly without having the gluten structure to actually raise a loaf. A loose, over-hydrated starter can pass the float test and still produce a flat bread. Treat volume doubling as your primary gate. The float test is a supportive signal, not a pass/fail verdict.
The smell of a healthy, ready starter is worth learning to recognize: pleasantly sour, maybe a little fruity or yogurty, with a clean fermented quality. If your starter smells sharply of nail-polish remover (acetone) or has an unpleasant, putrid quality, it’s telling you something is off – usually over-acidification or temperature stress.
Here’s what a mature, ready starter looks like at peak activity:
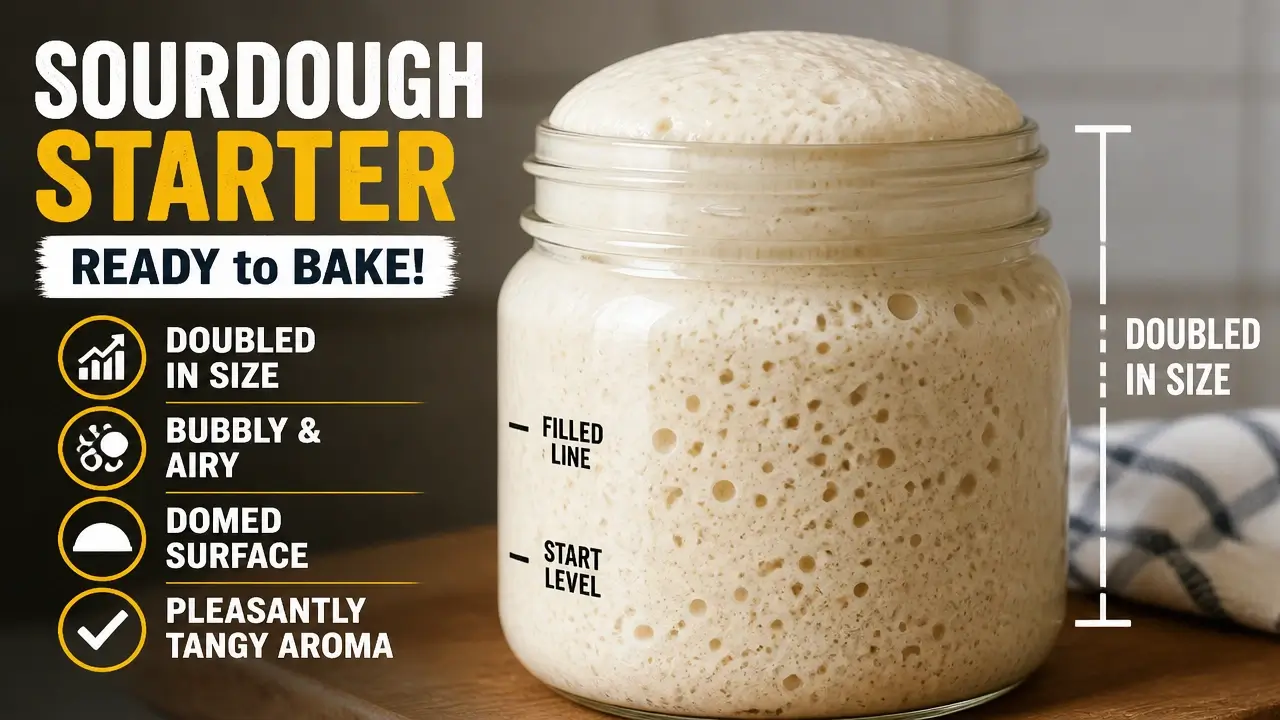
Most starters reach consistent readiness between Days 7 and 10. If yours takes up to 14 days – especially in a cool kitchen – that’s a completely normal outcome, not a sign of failure. If it’s passing the volume and smell tests reliably, you’ve built a mature sourdough culture. That’s the goal, and you’ve reached it.
When Your Starter Struggles: What to Do
Even a well-managed starter can hit a wall. The three most common problems each have a specific cause – and once you know what’s physically happening, the fix becomes obvious.
Diagnosing Mold, Hooch, and No Rise
Mold on the surface of a starter is the problem that looks the most alarming but is often the most salvageable. White or fuzzy surface mold can usually be addressed by scraping off the affected layer, discarding all but a small, clean portion from the bottom of the jar, re-feeding with fresh flour and water, and moving the starter to a slightly cooler spot with better airflow. Pink, orange, or black mold is a different situation – those colors indicate contamination that has likely penetrated beyond the surface. At that point, the starter needs to be discarded entirely. Sanitation over salvage.
Hooch – the dark, watery liquid that pools on top of a neglected starter – looks alarming but is simply a hunger signal. It’s a byproduct of alcoholic fermentation, produced when the culture has exhausted its food supply and the yeast have shifted to a different metabolic pathway. Pour it off, discard about 75% of the remaining starter, and feed with fresh flour and water. Hooch is not a crisis. It’s the starter telling you it needs food.
No rise after 14 days is the trickiest problem because it can have multiple contributing causes. If your starter is producing bubbles but the volume barely moves, the most likely culprit is over-acidification – the acid level in the jar has climbed high enough to suppress yeast activity, which means you’re getting bacterial fermentation (bubbles) without the CO₂ production needed for leavening (rise).
The three-step repair protocol for this specific scenario:
- Shift to whole-grain rye or whole-wheat flour for a few days. These flours have a higher buffering capacity – they resist the pH drop that suppresses yeast – and they bring in fresh microbes that can help rebalance the culture.
- Raise the fermentation temperature by 5–10°F. Yeast produce CO₂ poorly in cold conditions, even when the bacteria are still active. Warming the environment often restores visible rise within 24–48 hours.
- Confirm your hydration is 100% – equal weights of flour and water. A stiff starter physically can’t trap gas effectively, so even healthy yeast activity won’t produce visible volume change.
After adjusting these variables, do not feed again for 24 hours. Give the culture time to respond before adding more flour.
Dr. Giuseppe Spano from the Department of Agriculture, Food and Environment Sciences at the University of Foggia, whose research examined how sourdough starters survive long-term storage, found something worth knowing here:
“This study showed that frozen storage enables until 90 days a partial preservation of the starter lactic acid bacteria and the obtainment of bread approaching that produced from unstored sourdough.”
That finding points directly to the most underused piece of insurance in home baking.
Long-Term Storage and Your Frozen Backup
Once your starter is consistently mature – doubling reliably, smelling right, passing the volume test – it doesn’t need daily attention anymore. Feed it, let it sit at room temperature for an hour to get the fermentation going, then put it in the refrigerator. At refrigerator temperatures, the microbial activity slows dramatically, and a weekly feeding is enough to keep the culture healthy. Pull it out the night before you plan to bake, feed it, and let it come back to full activity at room temperature.
On the same day you confirm your starter is mature, take one more step: spoon about 50 g of the freshly fed, bubbly starter into a zip-top freezer bag, label it with the date, and freeze it flat. That’s your insurance policy. If your active starter ever dies – from neglect, contamination, or an accidental oven preheat – this frozen backup can be thawed and revived with 2 to 3 consistent feedings. You will not have to start from scratch.
The frozen bag transforms starter-keeping from a high-stakes, all-or-nothing commitment into something much more forgiving. Even a baker who goes months without touching their starter has a path back. That’s the last thing to know before you start – and probably the most reassuring.
Key Takeaways on Making a Sourdough Starter
- A sourdough starter is a living ecosystem of wild yeasts and lactic acid bacteria, not a single-strain ingredient you can replicate from a packet.
- A digital kitchen scale is the one non-negotiable tool – cup measurements introduce hydration variability that can silently stall the culture.
- About 30% of U.S. municipal water contains chloramine, which does not evaporate and can inhibit the culture even when everything else is right.
- The quiet phase on Days 3–5 is ecological succession, not failure – pioneer bacteria acidify the environment, then acid-tolerant Lactobacillus and wild yeasts take over.
- Volume doubling within 4–8 hours after feeding is the primary readiness test; the float test is a supportive signal, not a reliable gate on its own.
- Freezing 50 g of mature starter on Day 7 gives you a recoverable backup that survives up to 90 days, eliminating the risk of starting from zero after any setback.
Frequently Asked Questions About Making a Sourdough Starter
What is the biggest mistake beginners make when starting a sourdough culture?
Not discarding enough before each feeding is the most common error – leaving too much old starter means the microbes exhaust their food supply before the next feed, which drives acid levels up and stalls the culture. The second most costly mistake is giving up during the Day 3–5 quiet phase, which is a normal biological transition, not a sign of failure.
How do you make a sourdough starter if you’ve never done it before?
Mix equal weights (60 g each) of whole-grain flour and water in a clean glass jar, cover loosely, and leave at room temperature. Each day, discard half and feed with fresh flour and water in the same ratio. Most starters reach baking readiness between Days 7 and 14.
What is the 1/3/3 rule for sourdough starter?
The 1/3/3 ratio means feeding 1 part existing starter to 3 parts flour and 3 parts water by weight – a more diluted feed that’s typically used once a starter is already mature and you want to extend the time between feedings without the culture over-acidifying. It’s not the right ratio for building a new starter from scratch, where a 1:1:1 ratio gives the culture a denser food supply to establish itself.
Can you make sourdough starter with just all-purpose flour?
You can, but it’ll take longer and may show less early activity. Whole-grain rye or whole-wheat flour carries more of the natural microbes and minerals that jumpstart fermentation – the bran and germ are where most of that microbial life lives. Once the culture is active and rising consistently, switching to all-purpose flour for maintenance is completely fine.
Why does my starter smell like nail-polish remover?
That acetone-like smell is a sign of over-acidification – the acid balance in the jar has tipped past the point where yeast are comfortable working. Try shifting to whole-grain rye flour for a few feedings, raising the fermentation temperature slightly, and confirming you’re discarding at least half before each feed. The smell should normalize within 2–3 days.
Does the type of water really matter that much?
It matters more than most guides admit. Chlorine in tap water can be off-gassed by leaving water uncovered for 24 hours, but chloramine – used in roughly 30% of U.S. municipal systems – does not evaporate. If your starter seems persistently sluggish despite good technique, switching to a carbon-filtered or bottled water is the fastest way to rule out water chemistry as the cause.
How do you know if a sourdough starter has gone bad and can’t be saved?
Pink, orange, or black mold is the clearest signal that the starter needs to be discarded – those colors indicate contamination that has likely spread beyond what you can see. A sharp, putrid smell that doesn’t improve after a feeding or two is also a reliable sign. White surface mold and dark hooch liquid are usually salvageable; anything with bright or dark mold colors is not.
Is it normal for a sourdough starter to take longer than 7 days?
Completely normal – especially in a kitchen that runs cooler than 70°F. A starter in a 65°F kitchen can take 12 to 14 days to show consistent doubling, simply because the microbial activity is slower at lower temperatures. The timeline in most guides assumes a warm environment; if yours is cool, add several days to your expectations rather than changing your process.
References
- Gänzle, M. – Sourdough starter microbiology and lactic acid bacteria – ScienceDirect (sciencedirect.com)
- Socaciu, M-I. – Temperature effects on sourdough acidification and fermentation period – MDPI Applied Sciences (mdpi.com)
- Ouhssine, M. – Real-time fermentation tracking and temperature effects on dough rising – MDPI Fermentation (mdpi.com)
- Sadowski, P.J. – Mature leaven microbiome succession and daily feeding observations – MDPI Fermentation (mdpi.com)
- Spano, G. – Frozen storage of sourdough starter and lactic acid bacteria preservation – ScienceDirect LWT Food Science and Technology (sciencedirect.com)