

A struggling sourdough starter isn’t a dead one – it’s a biological system sending you a diagnostic signal you haven’t decoded yet. Every symptom, from sudden flatness to acetone smell to mysterious hooch, maps to a specific, fixable cause.
The good news: almost every problem except visible mold has a straightforward mechanical solution. Work through the variables one at a time – temperature, consistency, feeding ratio, flour, water – and your starter will almost always come back. Let’s trace exactly what’s going wrong and why.
Your Starter Isn’t Dead: The False Rise and the Silent Phase
A flat sourdough starter after two or three days of wild bubbling is not failure – it’s the predictable result of a bacterial handoff that almost every beginner misreads as death. The early activity you saw was real fermentation, just not the kind that builds a lasting culture. Here’s what actually happened inside that jar.
For the first 48 to 72 hours, a group of bacteria called Leuconostoc take over the fresh flour-and-water mixture. They’re gas producers, enthusiastic ones, and they create the impressive rise that makes beginners think they’re winning. But Leuconostoc can’t survive in an acidic environment – and as they ferment, they produce the very acids that poison them. Acidity builds, they die off, and the jar goes quiet.
That silence isn’t your starter dying. It’s the old crew clearing out so the right crew can move in.
The acid-tolerant wild yeasts and lactic acid bacteria – the organisms that will actually power your bread – need that acidic environment to establish themselves. They typically colonize between Days 5 and 7. So if you’re staring at a flat, seemingly lifeless jar on Day 4, you’re not behind schedule. You’re right on time.
Sourdough microbiologist and Bread Bakers Guild of America contributor Debra Wink describes this succession precisely:
“During the first few days of starting a new culture, there is a predictable succession of microbes. At first, bacteria that cannot survive in the low pH of a mature starter dominate. One of these, Leuconostoc, produces a lot of gas, which can look like a great rise on day 2 or 3. But as the acid builds up, these early bacteria die off, and there is often a period of ‘quiet’ or silence where nothing seems to happen before the acid-tolerant yeasts and lactic acid bacteria finally take over.”
The science backs this up at a population level. Research published in eLife on the diversity and function of sourdough starter microbiomes – covering a genome-wide analysis of more than 500 starters – documents exactly this shift: Leuconostoc proliferates during the early phase, then gets competitively suppressed as pH drops, making room for acid-tolerant Lactobacillus and Saccharomyces to dominate. A companion study on microbial succession in sourdough confirms that the early opportunistic bacteria are displaced by allelopathic metabolites produced by the incoming LAB – meaning the new microbes actively push the old ones out. And a third study on pH-driven bacterial relay in sourdough ties the whole transition to the falling pH curve, confirming that the Leuconostoc die-off isn’t random – it’s chemically triggered.
The practical rule of thumb is simple: if you don’t see pink, orange, or green mold, keep feeding. Your starter is following a biological script written across thousands of years of fermentation. The silence is part of the story, not the ending.
Temperature: The Most Common Silent Saboteur
Cold temperature is the single most frequent reason a sourdough starter stalls for days without explanation, and it’s also the easiest variable to fix tonight. Wild yeast metabolism is acutely temperature-sensitive – below 70°F (21°C), activity slows to a crawl; above 74°F (24°C), the culture starts waking up noticeably.
Most home kitchens sit between 65°F and 68°F, especially in the morning or in winter. That’s below the threshold where yeast produces enough carbon dioxide to create visible rise. The starter isn’t dead – it’s metabolically throttled.
The ideal growth range for a sourdough starter is 74°F to 85°F (24°C to 29°C). Getting there doesn’t require special equipment. Three no-cost fixes work reliably:
- Top of the refrigerator: The compressor generates gentle ambient warmth – consistent, draft-free, and usually right in the sweet spot.
- Near a heating vent: Position the jar a foot or two away so it receives indirect warmth without hot-air blasts.
- Inside a turned-off oven with the light on: The bulb raises the interior to roughly 75°F–80°F, creating a perfect proofing chamber.
Beyond placement, the water you feed with matters. Cold tap water – straight from the faucet in winter – can drop the jar temperature by several degrees per feeding. Switch to water heated to 85°F–90°F (29°C–32°C) before mixing. It gives the culture an immediate metabolic boost and keeps the overall temperature stable between feedings.
One hard boundary to respect: above 130°F (54°C), yeast dies. If you’re warming water on the stove or in the microwave, test it with a thermometer or your wrist before adding it. You’re aiming for pleasantly warm, not hot.
Maurizio Leo, engineer, professional baker, and author of The Perfect Loaf, explains the stakes directly:
“If your kitchen is cold, yeast activity slows down dramatically. Yeast is highly temperature-sensitive, and at lower temperatures (below 70°F/21°C), its metabolism slows to a crawl. The starter will still ferment, but it will take much longer to rise, or it may not rise visibly at all because the carbon dioxide is being produced too slowly to build structure.”
Temperature is the first dial to check before anything else – because if the environment is wrong, no other fix will work consistently.
Bubbling but Flat? Why Consistency Robs Your Rise
A bubbly sourdough starter that never climbs the jar isn’t a fermentation problem – it’s a structural one. Gas is being produced, but the mixture is too thin to trap it, so every bubble punches through the surface and escapes instead of lifting the batter.
Think of it like trying to blow bubbles in water versus in dish soap. The water has no structure to hold the gas. The soap does. A starter that’s too liquid behaves like the water – all activity, no lift.
The most common cause is measuring by volume rather than weight. Water is roughly twice as heavy as flour by volume, so when you measure a cup of each, you’re actually adding far more water than flour by mass. The result is a thin, pourable slurry that can’t hold its own weight, let alone trap CO₂.
The fix is a digital kitchen scale and equal weights. A simple 25g starter : 25g flour : 25g water works for most beginners. That ratio produces a thick, stiff mixture – closer to heavy pancake batter that mounds slightly in the jar – not a pourable crepe consistency.
Here’s a quick visual reference for what the right texture looks like versus a starter that’s too wet:
If your starter is showing bubbles but zero rise, check the consistency before anything else. It’s the most overlooked fix and often the fastest one.
Overfed or Starving? The Feeding Ratio That Rescues a Stalled Starter
A sourdough starter that’s been fed daily on schedule can still stall – and the reason is almost always the ratio, not the frequency. Overfeeding and underfeeding are two opposite problems that produce confusingly similar symptoms: a flat, lifeless jar. Knowing which one you’re dealing with changes the fix entirely.
Overfeeding and Underfeeding Symptoms in a Stalled Sourdough Starter
Overfeeding happens when you add too much fresh flour and water relative to the amount of active starter. The large volume of new material dilutes the existing acidity below the threshold where yeast can activate. Signs: the mixture looks like fresh batter, never changes texture, produces no hooch, and shows little to no bubbling. It’s not dead – it’s just been drowned in food it can’t process yet.
Underfeeding is the opposite. When the starter burns through its food supply faster than you’re replacing it, it shifts into starvation mode and produces ethyl alcohol as a by-product. Signs: a dark, watery liquid (hooch) pools on top, the mixture stratifies into layers, and the smell turns sharp – acetone, nail polish remover, or strong vinegar.
The standard reference ratio that balances both extremes is 1:1:1 by weight – equal parts active starter, flour, and water. By weight, not volume.
Here’s a side-by-side breakdown to make the diagnosis easier:
| Overfeeding | Underfeeding | |
|---|---|---|
| What it looks like | Fresh batter, no change, no hooch | Dark liquid on top, separated layers |
| Smell | Mild, yeasty, or neutral | Sharp acetone, nail polish, or vinegar |
| Bubbles | Few or none | Some, but structure is weak |
| Root cause | Acidity too diluted to activate yeast | Starter ran out of food |
| Fix | Reduce the feed volume relative to starter kept | Feed more frequently or increase feed amount |
| Ratio adjustment | Keep more starter, add less flour/water | Feed twice daily until recovery |
Revival Ratios and Rescue Techniques for a Stalled Starter
Once you’ve identified the direction of the imbalance, the fix is mechanical. For an underfed starter, feed twice a day – morning and evening – at the standard 1:1:1 ratio. A hungry starter typically recovers within two or three feeding cycles once the food supply is consistent.
For an overfed starter, reduce the dilution. Keep a larger proportion of the active culture and add a smaller amount of fresh flour and water. This concentrates the existing microbial population instead of swamping it.
When even a consistent 1:1:1 feeding doesn’t wake things up after a few days, experienced bakers flip to a 2:1:1 revival ratio – two parts starter to one part flour and one part water by weight. By doubling the starter share, you preserve the existing microbial density and retain the protective acidity that the culture needs to re-establish itself quickly. This isn’t a permanent maintenance schedule – use it for two or three feedings when the starter has been flat for days despite correct conditions, then return to 1:1:1 once activity resumes.
One more no-cost technique worth adding to any feeding: whip air into the mixture vigorously with a fork or small whisk before covering the jar. The brief oxygen exposure gives the culture a metabolic ignition boost before it transitions into anaerobic fermentation. It costs nothing and adds no risk.
A note for the flour-conscious baker: the daily-discard-or-die rule is a myth. A mature, established starter handles a 36-hour gap between feedings without problem. Stir to redistribute the food, resume normal feeding the next day, and don’t stress the missed window. Reducing unnecessary discard is both practical and sustainable.
For those who want to remove all guesswork eventually, pH strips are the advanced tool – a mature, healthy starter targets roughly 3.8 to 4.2 on the pH scale at peak activity. But for a struggling beginner, the smell test and the hooch visual are perfectly reliable guides. You don’t need lab equipment to read your starter accurately.
Flour Fails: Why Bleached Flour Keeps Your Starter Hungry
Bleached flour is one of the most common hidden brakes on a sourdough starter, and most beginners never suspect it because the bag looks like flour and behaves like flour in every other baking context. The problem is biological, not structural.
The chemical bleaching process – typically using benzoyl peroxide or chlorine gas – does more than whiten the flour. It strips away the wild yeasts and beneficial bacteria that live naturally on the grain’s surface. Those microbes are exactly what a new starter needs to colonize and build a stable culture. Feed a starter with bleached flour and you’re essentially offering it a sterile growing medium with nothing alive to recruit.
Even unbleached all-purpose white flour can fall short. The milling process removes the bran and germ – the most microbe-rich, mineral-dense parts of the grain – leaving mostly starchy endosperm. It ferments, but slowly, and without the enzymatic richness that wild cultures thrive on.
The practical fix is a two-part swap. First, switch your base flour to unbleached bread flour or unbleached all-purpose. Second, for the next one or two feedings, replace 10–20% of that flour with whole-grain rye or whole wheat flour. Whole rye in particular is exceptionally rich in wild yeast, bacteria, and the amylase enzymes that break starch into the sugars microbes need to eat. It acts as a biological accelerant.
This whole-grain boost is a troubleshooting tool, not a permanent recipe change. Once your starter is reliably doubling, you can return to pure white flour if that’s your preference. The culture is established – it no longer needs the extra inoculation. And you don’t need specialty flour for this: standard grocery-store whole wheat or rye works exactly as well as anything from a specialty mill.
PJ Hamel, Senior Baking Author and Sourdough Expert at King Arthur Baking, explains why the swap matters at the microbial level:
“Bleached flour has been chemically treated, which not only whitens it but also strips away much of the natural wild yeast and beneficial bacteria present on the grain. Furthermore, the bleaching process damages nutrients that the microbes need to thrive. If your starter is sluggish, switching to unbleached flour, or boosting it with nutrient-dense whole grains like rye or whole wheat, provides a rich mineral and microbial buffet that jumpstarts fermentation.”
If you’ve had temperature, consistency, and ratio dialed in for days and still nothing is moving – check the flour bag for the word “bleached.” That single word may be the only thing standing between you and an active starter.
The Silent Killer in Your Tap: Chlorine and Chloramine
Municipal tap water is designed to be safe to drink – and the way it achieves that is by killing microorganisms. Chlorine and chloramine are added specifically to eliminate bacteria and other microbial life in the water supply. That’s excellent for public health. It’s a direct problem for a sourdough starter.
When you use chlorinated tap water to feed your starter, you’re introducing an antimicrobial agent into a culture that depends entirely on living microbes. The wild yeasts and lactic acid bacteria in your starter are not meaningfully different from the organisms the water treatment is designed to suppress. Consistent exposure slows colonization, weakens the culture, and can prevent a new starter from establishing entirely.
According to the U.S. Environmental Protection Agency, chloramines are now used in many municipal water systems as a more stable alternative to chlorine – and unlike chlorine, chloramine does not evaporate when left to sit. The standard advice of “leave tap water out overnight” neutralizes chlorine gas effectively but leaves chloramine untouched.
The fix depends on what your water contains:
- Chlorine only: Fill a container, leave it uncovered at room temperature for 24 hours. The gas dissipates on its own.
- Chloramine: You need a carbon-block water filter (like a Brita pitcher) or bottled spring water. Chloramine requires active filtration to remove.
- Safest universal option: Bottled spring water or filtered water from a quality pitcher. Well water that isn’t treated works well too.
The diagnostic test is simple: change only the water, keep everything else identical, and observe the starter for the next 24 to 48 hours. If warmth, consistency, and feeding ratio are all correct and the starter is still showing zero life, tap water is the most likely remaining culprit.
Dr. Gabriel G. Perron, Associate Professor of Biology specializing in Microbial Ecology at Bard College, frames the mechanism directly:
“Chlorine and chloramine are added to municipal tap water specifically to kill microbes and prevent bacterial growth. When you use heavily chlorinated tap water to feed your starter, these chemicals can actively harm or suppress the delicate wild yeasts and lactic acid bacteria necessary to establish and sustain the fermentation process.”
It sounds almost too simple – that the water could be quietly undoing every other thing you’ve done right. But it’s a real variable, it’s invisible, and it’s worth eliminating before you conclude the starter is unsaveable.
Contamination, Mold, and What That Smell Really Means
Most alarming smells coming from a sourdough starter are not signs of contamination – they’re signs of hunger. But some visual cues are genuine red lines. Knowing the difference saves you from throwing away a healthy culture and, more importantly, from keeping one that’s actually unsafe.
Start with the smell, because that’s usually what triggers the panic.
- Acetone or nail polish remover: The starter is hungry and has started producing ethyl alcohol as a starvation by-product. This is normal and fixable – feed it and the smell clears within a cycle or two.
- Cheese, yogurt, or milky sourness: Completely normal lactic acid activity. This is the smell of a working culture.
- Rotten, putrid, or sulfurous: This is unusual and warrants a visual inspection before feeding again.
Once you’re looking at the jar, the visual signals are more definitive than smell.
Here’s a photo that shows the difference between normal hooch and actual mold contamination – two things beginners frequently confuse:
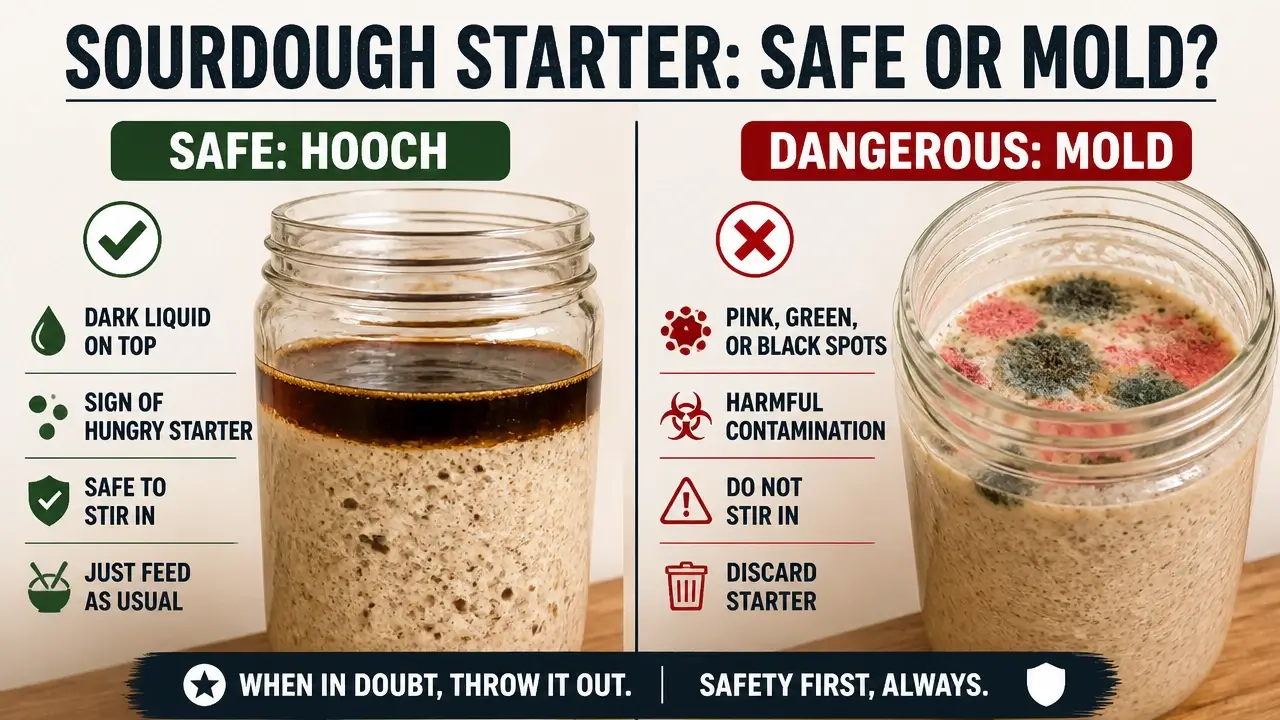
Hooch – the dark, watery liquid that pools on top – is not contamination. It’s a by-product of a starter that’s run out of food. You can stir it back in or pour it off, then feed normally. The starter underneath is fine.
Mold is a different category entirely:
- Pink or orange streaks or liquid running through the starter: This is pathogenic bacterial contamination. Discard the entire batch immediately. Do not scrape off the affected layer and continue – the contamination runs through the culture even where it’s invisible.
- Green, black, or white fuzzy patches on the surface: This is fungal mold. Discard and don’t attempt to salvage by removing the visible growth.
The King Arthur Baking Sourdough Support Team draws the line clearly:
“An acetone or nail polish remover smell usually just means your starter is extremely hungry and has run out of food. However, if you see actual mold growing on the surface, or pink, orange, or red streaks running through the starter, this is a sign of harmful bacterial contamination. In these cases, the starter’s ecosystem has been compromised and it is no longer safe to keep; you must discard it and start over.”
If you do need to discard and restart, the sanitization protocol matters. Wash the jar in hot soapy water, then either boil it or rinse it with a diluted bleach solution and let it air dry completely before starting fresh. Residual contamination in the jar can infect the new batch before it has a chance to establish.
If there’s no visible mold and only a strong acetone or alcohol smell, skip the drama. Run two back-to-back 12-hour feedings over 48 hours and watch the smell resolve. The starter isn’t gone – it’s just asking to be fed.
The Final Call: Troubleshoot or Start Over?
After working through every variable, the question that remains is the most practical one: when does persistence stop making sense? The answer is almost always “keep going” – but it helps to have a clear, non-emotional framework to confirm that.
Work through this decision tree in order. Each step either resolves the problem or hands it off to the next variable:
Is there any visible mold – pink, orange, green, black, or fuzzy patches? → Yes: Discard, sanitize the jar, start over. No exceptions. → No: Continue to the next check.
Is the environment warm enough – consistently 74°F–85°F (24°C–29°C)? → No: Relocate the jar, switch to warm water feedings. Give it 48 hours. → Yes: Continue.
Is the consistency thick enough – stiff pancake batter, not pourable slurry? → No: Switch to weight-based measuring. Equal grams of starter, flour, and water. → Yes: Continue.
Is the feeding ratio matched to the symptoms – not over-diluted, not starving? → No: Adjust to 1:1:1 as the baseline, or use the 2:1:1 revival ratio for 2–3 feedings if the starter has been flat for days. → Yes: Continue.
Has a whole-grain flour boost been tried? → No: Replace 10–20% of the flour with whole-grain rye or whole wheat for the next two feedings. → Yes: Continue.
Is the water chlorine-free and chloramine-free? → No: Switch to filtered or bottled spring water immediately. → Yes: Keep feeding. Time will win.
Every problem on this list except mold is fixable with a specific, deliberate action. The old advice to “just be patient” assumes there’s nothing left to do – but you’ve now seen that switching to a 2:1:1 ratio, introducing whole-grain flour, and correcting water chemistry can cut revival time from weeks to days. Patience works faster when it’s paired with the right variables.
The time-bound sanity check: if you’ve worked through every item on this list, confirmed each variable is correct, and the starter still shows zero signs after 3 to 4 weeks – no bubbles, no sour scent, no rise at any point – then starting over is a reasonable call. That scenario is genuinely rare. Most starters that reach this point were either too cold, too thin, or fed with bleached flour or chlorinated water the entire time.
You came into this with a jar of flat batter and a fear that you’d ruined something. You’re leaving with a diagnostic checklist and a clear framework for every scenario the starter can throw at you. That’s the difference between passive waiting and active troubleshooting – and it’s why your next starter, or this one revived, will go much faster.
Key Takeaways on Sourdough Starter
- A flat sourdough starter on Days 4–5 is biologically normal; the early Leuconostoc bacteria die off as acidity builds, creating a silent gap before true wild yeast colonizes.
- Wild yeast metabolism stalls below 70°F (21°C), making temperature the most common and most overlooked reason a starter stops rising.
- Gas bubbles without visible rise almost always mean the mixture is too thin; switching to equal weights of starter, flour, and water solves it immediately.
- Overfeeding dilutes acidity and prevents yeast activation; underfeeding starves the culture and produces hooch – both stall the starter, but the fixes are opposite.
- Bleached flour strips away the wild microbes a starter needs to colonize; a 10–20% whole-grain rye boost for one or two feedings acts as a biological accelerant.
- Pink, orange, or fuzzy mold is the only scenario that requires discarding; every other symptom – hooch, acetone smell, flat texture – is fixable with targeted adjustments.
Frequently Asked Questions About Sourdough Starter
What do you do if your sourdough starter isn’t rising?
Work through the variables in order: confirm the environment is above 74°F, check that the consistency is thick enough to trap gas, verify your feeding ratio is 1:1:1 by weight, rule out bleached flour, and switch to filtered water if you’ve been using tap. Most starters respond within 24–48 hours once the right variable is corrected.
Why is my starter bubbling but not doubling in size?
Bubbles without volume rise almost always mean the batter is too thin to hold gas. Measure by weight instead of cups – equal grams of starter, flour, and water – and the mixture will be thick enough to trap CO₂ and climb the jar.
What are the signs of an overfed starter?
An overfed starter looks like fresh batter that never changes: no hooch, minimal bubbles, no rise, and a mild or neutral smell. The acidity has been diluted too far for yeast to activate. Reduce the feed volume relative to the starter you keep, or switch to a 2:1:1 ratio for a few cycles to concentrate the culture.
How do I know if my starter is dead or just dormant?
If there’s no mold and no pink or orange streaks, it’s almost certainly dormant, not dead. A starter that smells like acetone and shows dark liquid on top is hungry, not gone. Two back-to-back 12-hour feedings at the right temperature will tell you definitively whether the culture is still viable.
Can I use any tap water to feed my sourdough starter?
Not safely, if your municipal supply uses chloramine rather than chlorine. Chlorine evaporates if you leave water uncovered for 24 hours, but chloramine requires active carbon filtration. Bottled spring water or a quality pitcher filter is the safest default until you know what’s in your local water.
Does the type of flour really matter that much?
Yes – bleached flour is chemically treated in a way that removes the surface microbes a new starter depends on for colonization. Unbleached flour is the baseline minimum, and adding 10–20% whole-grain rye for a feeding or two provides a meaningful microbial and enzymatic boost when a starter is stuck.
How long should I wait before giving up on a stalled starter?
If all variables – temperature, consistency, feeding ratio, flour type, and water – are confirmed correct, give it 3 to 4 weeks before considering a restart. That timeline is a genuine edge case; most starters that stay flat for weeks have at least one variable still wrong.
Is the daily discard rule actually necessary?
Not for a mature starter. Once your culture is established, it handles 36-hour gaps between feedings without problem. Simply stir to redistribute the food and resume your normal schedule. The strict daily-discard mandate applies primarily to new starters in their first two weeks, when consistency accelerates colonization.
References
- The Diversity and Function of Sourdough Starter Microbiomes – elifesciences.org
- Microbial Succession and the Rise of Acid-Tolerant LAB – pmc.ncbi.nlm.nih.gov
- Impact of pH on Succession of Sourdough Lactic Acid Bacteria – pmc.ncbi.nlm.nih.gov
- Introducing Debra Wink – kingarthurbaking.com
- Sourdough Starter Troubleshooting Guide – theperfectloaf.com
- Sluggish Starter – kingarthurbaking.com
- Chloramines in Drinking Water – epa.gov
- Microbial Ecology and Tap Water Study – doi.org
- Sourdough Starter Troubleshooting – kingarthurbaking.com