
Making a sourdough starter is one of those kitchen projects that sounds intimidating until you understand what’s actually happening – and then it clicks. You’re not building something from scratch so much as inviting something that already exists to move in. Wild yeast and lactic acid bacteria live on the grain itself, in the air around you, and on your hands. All flour and water do is give them a place to settle.
The whole process takes about 7–14 days, costs almost nothing, and requires no special equipment. Once you understand the biology behind it, the daily routine stops feeling like a chore and starts feeling like checking in on something alive.
What a Sourdough Starter Actually Is
A sourdough starter is a living culture of wild yeast and lactic acid bacteria – microorganisms that already exist on your flour and in the air around your kitchen – kept alive in a simple mixture of flour and water through regular feeding. That’s the whole thing. No commercial yeast packet. No special inoculant. Just flour, water, and the invisible microbial world that’s been fermenting grain for thousands of years.
Think of it like this: your flour isn’t inert powder. It’s a dormant ecosystem. The bran layer of whole grains carries populations of wild yeast and bacteria, and the moment you mix that flour with water and leave it somewhere warm, those microbes wake up and start feeding on the starches. Your job is to keep them fed so they grow strong enough to leaven bread.
The culture you’re building will do two things once it’s mature: the wild yeast produces carbon dioxide gas, which makes your dough rise, and the lactic acid bacteria produce lactic and acetic acids, which give sourdough its characteristic tangy flavor. These two populations don’t just coexist – they work together, each creating conditions the other needs to thrive.
Sourdough Expert Dr. Luc De Vuyst, Professor of Industrial Microbiology and Food Biotechnology at Vrije Universiteit Brussel, describes it plainly:
“Sourdough is a specific and stressful ecosystem inhabited by yeasts and lactic acid bacteria (LAB)… Spontaneous fermentation of the flour-water mixture, thanks to the wild microorganisms present in the flour, other ingredients, or the environment… often harbor particular consortia of LAB and/or yeasts… The LAB to yeast ratio is mostly 10:1 to 100:1”
That 10:1 to 100:1 ratio is worth pausing on. Your starter is far more bacterial than it is yeasty – and the bacteria are what drive the acidification process that makes the whole ecosystem stable, safe, and flavorful. The yeast gets the glory, but the bacteria are doing the heavy lifting.
The ingredients list is genuinely short: flour, water, and time. No exotic additions, no special cultures, no equipment beyond what’s already in most kitchens. A “tiny fermented dough pet” is actually a reasonable way to think about it – you feed it, it grows, and it rewards you with the ability to bake extraordinary bread.
Tools & Ingredients You Actually Need
Minimal, well-chosen kitchen equipment makes the difference between a starter that confuses you and one you can read clearly from day to day. You don’t need much – but what you do need, you really do need.
A “tiny fermented dough pet” is actually a reasonable way to think about it you feed it, it grows, and it rewards you with the ability to bake extraordinary bread, but don’t forget proper storing sourdough starter.
The ingredients list is genuinely short: flour, water, and time. No exotic additions, no special cultures, no equipment beyond what’s already in most kitchens. A “tiny fermented dough pet” is actually a reasonable way to think about it you feed it, controlling the sourdough starter hydration, it grows, and it rewards you with the ability to bake extraordinary bread.
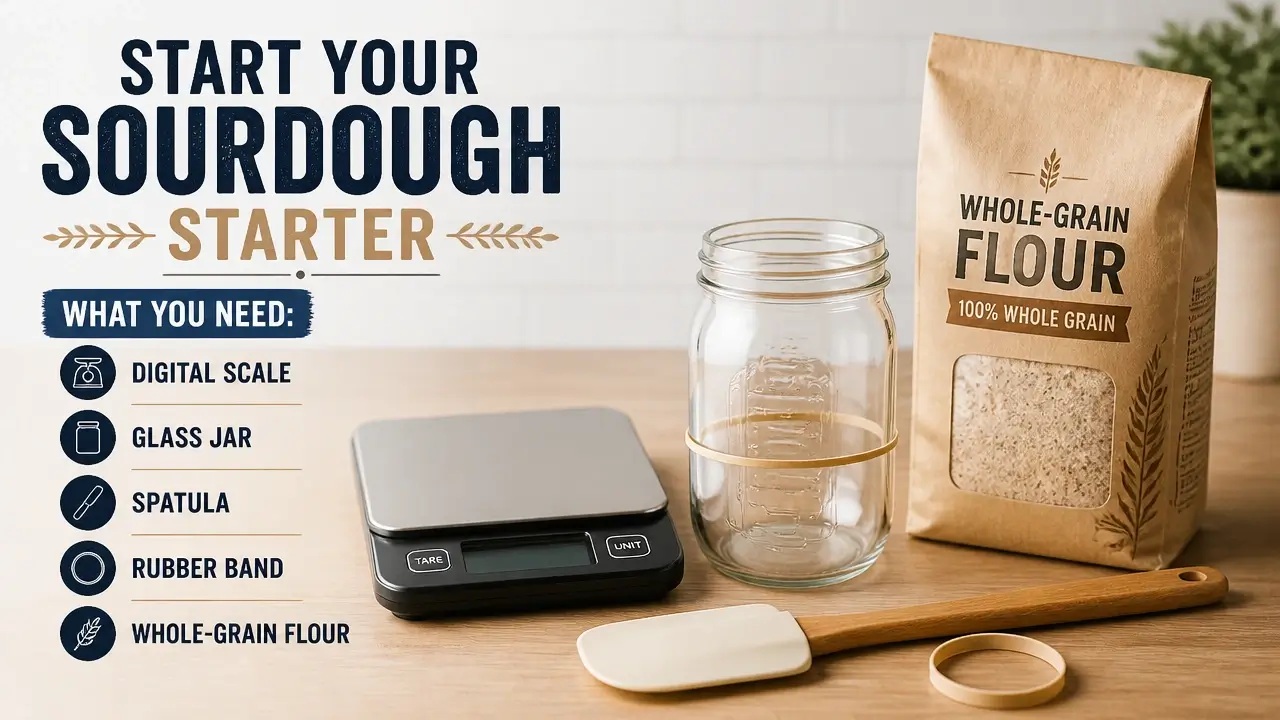
Here’s the core list:
- Digital kitchen scale: This is non-negotiable. Sourdough operates on weight ratios, not volume. A cup of flour can weigh anywhere from 120g to 160g depending on how packed it is – that kind of variance will throw off your starter’s hydration and slow its development. A cheap digital scale that reads in grams solves this completely.
- Clear glass jar (wide-mouth): Wide-mouth mason jars work perfectly. Clear glass lets you see the bubble structure and track the rise without disturbing the culture. A wide mouth makes stirring easy.
- Spatula or sturdy spoon: For mixing and scraping the sides clean after each feeding. A clean jar interior helps you monitor rise accurately.
- Rubber band: Optional but genuinely useful. Snap it around the jar right after feeding to mark the starting level. When you check back in four hours, you’ll know exactly how much it has risen.
For flour, start with whole-grain rye or whole-wheat for the first few feedings. The bran in whole grains carries significantly more wild yeast and bacteria than refined white flour does – it’s a richer seed population to kick things off. Once your starter is active and predictable, you can transition to unbleached all-purpose or bread flour for everyday maintenance.
For water, room temperature is ideal. If you’re using municipal tap water, the simplest precaution is to fill a glass and let it sit uncovered for 24 hours before using it. This allows any chlorine to dissipate naturally.
Here’s the thing though – and this is worth saying clearly because a lot of beginner guides create unnecessary anxiety around it: chlorine levels in typical tap water are too low to wipe out a developing microbial colony. The real water danger is temperature. Water above 120°F (49°C) will kill yeast outright. Always use room-temperature water, never hot.
King Arthur Baking Company, a baking authority with over 200 years in the craft, reinforces the flour choice:
“Whole grain flours (like whole wheat or rye) drive the microbiome and functional features of wheat sourdoughs… Wholemeal flours based-sourdoughs appear to be a more suitable biotechnological tool to produce… breads with improved properties”
One last note on the jar lid: rest it loosely on top, or use a piece of cheesecloth secured with a rubber band. The fermentation process produces carbon dioxide gas, and a sealed jar will build pressure. You want it covered enough to keep debris out, but open enough for gas to escape freely.
Here’s a look at the basic setup before you begin:
Days 1–3: Mixing, Resting, and the “False Rise”
The first three days of making a sourdough starter involve more waiting than doing – and one moment that surprises almost every beginner.
Day 1: Weigh out 50g of whole-grain rye or whole-wheat flour and 50g of room-temperature water directly into your clean glass jar. Stir vigorously for about a minute until no dry flour remains and the mixture looks uniformly thick. Scrape the sides down, place the lid loosely on top, and leave the jar somewhere warm – ideally between 70–80°F (21–27°C). A spot on top of the refrigerator or near (not on) a warm appliance works well. Leave it alone for 24 hours.
Day 2: Open the jar and take a look. You might see a few small bubbles, or nothing at all – both are normal. You don’t need to feed it yet. You can give it a quick stir if you’d like, but it’s not required. Reseal loosely and leave for another 24 hours.
Day 3: This is your first real feeding. Pour or scoop out most of the mixture, leaving just 50g in the jar. Discard the rest (more on what to do with it later). Add 50g of fresh flour and 50g of room-temperature water to the 50g you kept, stir thoroughly, scrape down the sides, and snap your rubber band around the jar at the level of the mixture. Now watch what happens over the next several hours.
Here’s the moment that catches beginners off guard: around Day 3, many starters explode with activity. The mixture rises dramatically, fills with bubbles, maybe even pushes toward the lid. It looks like success. And then, within 24–48 hours, it completely deflates and goes quiet.
This is the false rise, and it’s actually a good sign.
What you’re seeing is a population bloom of early-colonizing bacteria – primarily Leuconostoc species and other gram-positive bacteria – that thrive in the initial low-acid environment. These aren’t the stable wild yeast you’re cultivating for. They’re the first wave, and they burn through their food supply quickly. When they die back, the mixture goes quiet and may even smell a little off.
If your starter has been going for two weeks and still won’t double. What’s wrong with your Sourdough starter not rising?
Dr. Marco Gobbetti, Professor of Food Microbiology at the Free University of Bozen-Bolzano, describes what’s happening at the microbial level:
“Although the abundant microbial diversity harbored by flours, a succession of dominating and sub-dominating populations of lactic acid bacteria suddenly occurred during sourdough propagation, leading to the progressive assembly of the bacterial community”
That “succession” is exactly what the false rise represents – the first population cycling through, making way for the more acid-tolerant lactic acid bacteria and wild yeast that will eventually stabilize your starter. The collapse isn’t failure. It’s the ecosystem reorganizing itself.
One practical note on timing: the 7-day timeline you see in most recipes assumes a kitchen that stays consistently around 75°F. For every 5°F below that, development roughly doubles in time. If your kitchen runs 65–68°F in the evenings, expect the whole process to take 10–21 days rather than 7. That’s not a problem – it’s just physics.
Days 4–6: The Quiet Phase (Don’t Panic)
The quiet phase of making a sourdough starter is the stretch most beginners misread as failure – and it’s actually where the most important biological work is happening.
After the false rise collapses, your starter may sit seemingly inert for several days. Little to no visible rise. A thin layer of grayish liquid pooling on top. A smell that ranges from sour and funky to something vaguely resembling a gym locker. None of this means your starter is dead.
Your daily routine for Days 4–6 stays the same: Once every 24 hours, at roughly the same time of day, discard down to 50g, add 50g fresh flour and 50g room-temperature water, stir well, scrape the sides, and reposition the rubber band.
That liquid on top has a name – hooch. It’s a dilute solution of alcohol and acids produced by hungry yeast and bacteria that have run out of food. It’s completely harmless. You can stir it back into the mixture if you want a more sour flavor profile, or pour it off if you prefer something milder. Either way, feed the starter as normal right after.
The acetone or nail polish remover smell is a related signal – it means your starter is over-acidified from going too long between feedings. The fix is straightforward: discard more aggressively (keep only 25g instead of 50g), feed with 50g flour and 50g water, and consider feeding twice a day for a day or two to dilute the acid load and give the microbes fresh fuel.
What’s actually happening during this quiet stretch is worth understanding, because it reframes the whole experience. Maurizio Leo, sourdough authority and author of The Perfect Loaf, explains the mechanism:
“As the fermentative process progresses… lactic acid bacteria… acidify the dough to values below 3.5… Fresh starter is generally not used as a leavening agent for bread and lacks complex flavors… It is characterized by feeding the dough to continuously spread and keep the microorganisms metabolically active”
That pH drop below 3.5 is the quiet phase doing its job. The lactic acid bacteria are acidifying the environment to a point where most competing microorganisms – including the ones that caused the false rise – can’t survive. They’re essentially sterilizing the ecosystem from the inside, clearing the field for the acid-tolerant wild yeast and stable LAB strains that will become your permanent starter population.
The biggest mistake here isn’t skipping a day. It’s overfeeding without discarding. If you add fresh flour and water without first removing the majority of the old culture, you dilute the developing microbial colony and extend the process unnecessarily. The discard step isn’t waste – it’s population management. Keep the ratio tight: 50g starter, 50g flour, 50g water, every 24 hours.
Day 7+: When Your Starter Comes Alive
An active, mature starter announces itself pretty clearly – and once you see it, you won’t confuse it with anything else.
Somewhere around Day 7 to Day 10 (later if your kitchen runs cool), the shift happens. You feed your starter, mark the rubber band, and come back four to six hours later to find the mixture has doubled in size, is filled with bubbles throughout, and smells genuinely pleasant – fruity, tangy, faintly yogurt-like. The texture turns spongy and web-like, almost like a foam. That’s the wild yeast producing carbon dioxide in quantity, and it means the microbial community has stabilized.
At this point, continue your daily discard-and-feed routine. If the starter is reliably doubling within four to five hours of each feeding, you can shift to feedings every 12 hours to build extra vigor before baking. This isn’t required – it just accelerates the process of strengthening the culture.
Dr. Michael Gänzle, Professor of Food Microbiology at the University of Alberta, puts the biology of this moment in precise terms:
“The specific microbial community in each spontaneous starter is shaped through frequent back-slopping and, once stabilized, achieves a typical density of ~10^9 bacterial Colony Forming Units (CFU) and ~10^7 yeast CFU per gram… yeast improves the loaf volume and aroma… by producing CO2 and ethanol”
That stabilization – a billion bacterial CFU and ten million yeast CFU per gram – is what you’ve been cultivating toward. The back-slopping Dr. Gänzle refers to is exactly the discard-and-feed process you’ve been doing all week. Each feeding selects for the microbes best adapted to your flour, your water, and your kitchen environment. Your starter is, in a real sense, yours.
One important note: “Day 7” is an average, not a deadline. Don’t bake just because a week has passed. Watch the behavior. A starter that doubles reliably and smells right is ready to be tested. One that’s still sluggish or inconsistent needs more time – and that’s fine.
How to Know Your Starter Is Ready to Bake
Starter readiness isn’t a feeling – it’s a measurable, observable pattern that you confirm over multiple feedings before trusting it with a loaf of bread.
There are three signs to look for, and you want all three showing up consistently:
- Reliable doubling: After a 1:1:1 feeding (50g starter, 50g flour, 50g water) at around 75°F, the starter doubles or triples in volume within 4–6 hours. This is the primary indicator of baking strength.
- Spongy, web-like structure: When you pull a spoon through the starter at peak rise, it should look like a foam – full of interconnected bubbles throughout, not just on the surface.
- Pleasant aroma: Fruity, tangy, lightly sour – like a mild yogurt or a ripe apple. Not acetone, not alcohol, not rot.
To run the visual check: right after feeding, snap your rubber band at the level of the mixture. Check back at the 4-hour mark. If it’s at or above double the starting level, that’s a strong signal.
You’ve probably heard of the float test – dropping a small spoonful of starter into a glass of water to see if it floats. It’s a fun trick, and a floating starter does confirm that enough gas is trapped in the culture to leaven dough. But it’s not the most reliable test on its own.
Maurizio Leo describes what a genuinely ready starter looks like:
“Development of bubbles, sweet smelling odor and double volume… Two twenty-fold feedings were performed at 12 or 24 h intervals to rejuvenate and expand the leaven… the cultures were fed with a frequency based on the rise observed… a regular daily rise was observed”
That phrase – “a regular daily rise” – is the key. Consistency is the real test of readiness, not any single dramatic moment.
Here’s why the float test can mislead you: a high-hydration (wetter) starter may sink even when it’s lively, because the loose structure doesn’t trap gas bubbles efficiently. Meanwhile, a stiff starter can float even when it’s not fully active, because the dense texture holds gas mechanically rather than biologically. Neither result tells you the whole story.
The only metric that reliably correlates with baking strength is timed doubling at a known temperature after a 1:1:1 feeding. Run that check for 2–3 consecutive days. If it passes each time, you’re ready to bake.
Troubleshooting: What to Do When Things Go Wrong
Common issues with a developing sourdough starter almost always have straightforward fixes – and most of what looks alarming is either normal biology or an easy adjustment. The section below covers the problems beginners actually encounter, in roughly the order they tend to appear.
Fixing Hooch, Acetone Smell, and a Stalled Rise
Hooch – that dark, watery liquid pooling on top of your starter – is the most common thing beginners mistake for a sign of death. It’s actually a hunger signal. When the yeast and bacteria run out of food, they produce a dilute mix of alcohol and acids as metabolic byproducts, and this liquid separates to the surface. Stir it back in for a tangier starter, or pour it off for something milder, then feed as normal.
The acetone odor – sharp, chemical, like nail polish remover – is a step further down the same road. It means over-acidification from going too long between feedings. The fix: discard more aggressively than usual. Keep only 25g of starter, add 50g flour and 50g water, and consider feeding twice a day for a day or two until the smell softens to something more pleasant and sour.
King Arthur Baking Company notes the chemistry behind why sourdough naturally resists spoilage:
“Sourdough is a natural preservation system that prolongs the mold-free shelf-life of bread… the antifungal activity of sourdough is mainly correlated with the presence of lactic and acetic acids… [but] mold contamination… requires a restart”
If your starter has simply stalled – no rise, no bubbles, no activity for several days – temperature is almost always the culprit. Cold kitchens dramatically slow microbial metabolism. Move the jar somewhere warmer: inside an oven with just the light on (not the heat), on top of the refrigerator, or near a warm appliance. Maintain your discard-and-feed schedule without skipping, and give it a few more days before concluding anything.
Spotting the Difference Between Mold and Kahm Yeast
Healthy starter indicators are easy to read once you know what you’re looking at – and distinguishing a thriving culture from a struggling or contaminated one is mostly a matter of knowing what each looks like.
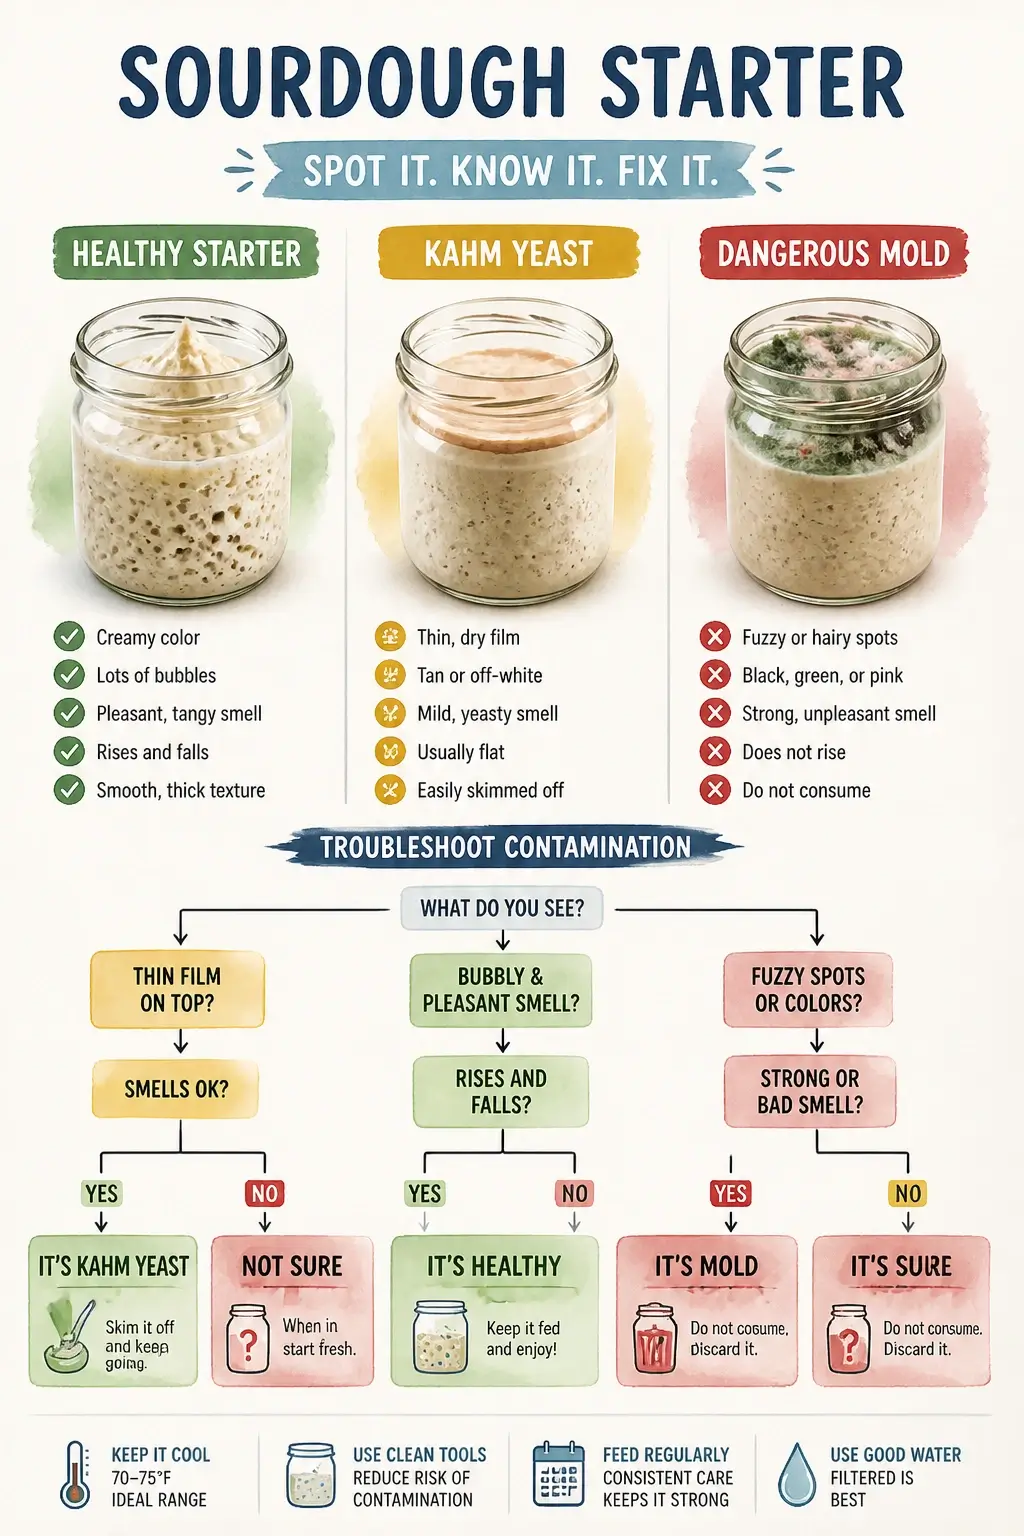
A healthy starter at peak rise has a mousse-like, domed surface, clusters of bubbles visible through the glass, and a uniform, spongy texture throughout. A struggling starter looks watery, shows little bubble activity, and may have visible liquid separation even before it’s due for feeding.
The most important visual distinction is between kahm yeast and mold. Kahm yeast is a flat, white or cream-colored film that forms on the surface – it looks like a thin skin or a powdery coating. It’s harmless. Scrape it off, discard as normal, feed, and continue.
Mold is different in every meaningful way: it’s fuzzy or powdery in texture, and it comes in colors – blue, green, black, orange, or pink. If you see anything that matches that description, do not try to feed through it. Discard the entire starter, wash the jar thoroughly with hot soapy water, and start fresh. This is a food safety issue, not a resilience test.
The most common beginner mistake that leads to either problem – aside from mold – is discarding too little. When you don’t remove enough of the old culture before feeding, the microbial population quickly outruns its food supply. The result is a sour, sluggish, off-smelling starter that seems to be getting worse despite regular feedings. The ratio is simple: keep 50g, add 50g flour, 50g water. Stick to it.
Here’s a visual guide to help you tell the difference between a contaminated and a healthy culture at a glance:
Keeping It Alive: Maintenance and Discard Uses
Starter maintenance doesn’t have to mean daily labor – and the discard you’ve been throwing away is actually a useful ingredient once your culture matures.
If you bake several times a week: Keep the starter at room temperature and feed it once every 24 hours. This keeps the culture at peak activity and means it’s ready to use at any time with just a few hours’ notice.
If you bake occasionally: This is the fridge method, and it’s how most home bakers actually operate. Once your starter is fully mature – reliably doubling, smelling right, passing the 2–3 day consistency check – move it to the refrigerator with a secure lid. The cold slows microbial activity to a near-standstill. Your starter goes dormant, but it stays alive.
From that point on, you only need to feed it once a week to keep it healthy. When a baking day approaches, take it out of the fridge, discard and feed it, and let it sit at room temperature for one to two feedings over about 24 hours. By the second feeding, it should be back to full activity and ready to go into your dough.
King Arthur Baking Company confirms that this dormancy is completely reversible:
“A mature starter can be stored indefinitely… The constituent microorganisms go dormant when a starter culture saturates, is left unfed, and is stored in a refrigerator. A dormant starter can be rejuvenated by feeding it regularly with a fresh water-flour mixture”
Indefinitely is not an exaggeration. Well-maintained sourdough starters have been passed down through generations. The biology is that stable once the culture is established.
As for the discard – once your starter is mature (Day 7 and beyond), save it in a separate jar in the fridge instead of throwing it away. Mature discard doesn’t have enough active leavening power to raise bread on its own, but it’s loaded with flavor. Stir it into pancake batter, waffle batter, cracker dough, or banana bread for a pleasant tang that you can’t get any other way. No rise required.
One important distinction: discard from the first week of development should go in the compost or trash. The microbial community is still unstable during that period, and early discard can have an unpleasant flavor. Once you’re past Day 7 and the starter is behaving predictably, the discard becomes genuinely worth saving.
You’ve now got a living culture that can last for years, a maintenance routine that fits around your life, and a use for every scrap of what comes out of the jar. The first loaf is the next step – and the starter you just built will carry it.
Key Takeaways on Making a Sourdough Starter
- Making a sourdough starter requires only flour, water, and time – wild yeast and lactic acid bacteria in your flour do all the work.
- A digital kitchen scale and whole-grain flour for the first few feedings are the two most impactful setup decisions you can make.
- The false rise on Day 3 is normal bacterial activity, not true yeast – the subsequent collapse means the ecosystem is reorganizing, not dying.
- The quiet phase on Days 4–6 is when lactic acid bacteria acidify the culture below pH 3.5, clearing the way for stable wild yeast to dominate.
- Readiness means reliably doubling within 4–6 hours of a 1:1:1 feeding for at least 2–3 consecutive days – not just one impressive rise.
- A mature starter can live in your fridge indefinitely on weekly feedings, and the discard makes excellent pancakes, waffles, and crackers.
Frequently Asked Questions About Making a Sourdough Starter
What’s the biggest mistake beginners make when starting out?
Discarding too little before each feeding is the most common way a starter stalls or develops off flavors. If you don’t remove the majority of the culture before adding fresh flour and water, the microbial population outgrows its food supply fast – keep 50g, feed 50g flour and 50g water, every time.
What is the 1:1:1 feeding ratio and when should I use it?
The 1:1:1 ratio means equal weights of starter, flour, and water – for example, 50g of each. Use it from Day 3 onward for daily maintenance, and as the standard test feeding when you’re checking whether your starter is ready to bake.
Can I use all-purpose flour from the start instead of whole-grain?
You can, but it’ll likely slow things down. Whole-grain rye and whole-wheat carry far more wild yeast and bacteria in their bran layer, giving the culture a richer seed population to kick off from. Once your starter is active and stable, switching to all-purpose or bread flour for daily maintenance is completely fine.
What does a healthy starter smell like, and when should I be worried?
A healthy starter smells pleasantly sour, fruity, or yogurt-like – think mild apple cider vinegar or ripe fruit. A sharp chemical smell like acetone or nail polish remover means it’s over-acidified and needs more frequent feeding. Rot or vomit-like smells combined with unusual colors are the warning signs to watch for.
My starter has been going for two weeks and still won’t double. What’s wrong?
Temperature is almost always the answer. If your kitchen runs below 70°F, microbial activity slows dramatically – move the jar somewhere warmer, like inside an oven with just the light on. Also check that you’re discarding enough before each feeding; too much old culture in the jar dilutes the developing colony.
Is the float test a reliable way to check if my starter is ready?
It’s a useful secondary check, but don’t rely on it alone. High-hydration starters can sink even when fully active because they don’t trap gas efficiently, while stiff starters can float without being ready. Timed doubling within 4–6 hours of a 1:1:1 feeding is the only measurement that reliably reflects actual baking strength.
Can I use my starter the same day I take it out of the fridge?
Not ideally. Cold slows the microbial activity significantly, so a refrigerated starter needs at least one – preferably two – room-temperature feedings over 24 hours before it has enough vigor to leaven bread properly. Take it out the day before you plan to bake.
What’s the difference between sourdough discard and active starter?
Active starter is fed, bubbly, and at or near peak rise – it has enough leavening power to raise bread dough. Discard is the portion you remove before feeding; it’s either unfed or past peak, so it won’t reliably raise bread on its own. It’s still full of flavor though, which makes it great for pancakes, waffles, and crackers where you don’t need it to rise.
References
- Sourdough Microbial Ecology and Fermentation – Frontiersin.org
- Sourdough Starter Guide and Baking Resources – Kingarthurbaking.com
- Research Review on Sourdough Microbial Kinetics – Frontiersin.org
- Sourdough Starter Troubleshooting Guide – Theperfectloaf.com
- Academic Literature on Sourdough Starter Development – Frontiersin.org